Create an AI Gateway & Send Your First Request
Task
Create an AI Gateway, obtain API credentials, connect to the AI Gateway Explorer app, and send your first request through the gateway.
Why
AI Gateway provides centralised observability, cost control, and safety for every AI inference call — regardless of which application or model is used. By routing AI traffic through a gateway, you gain full visibility into prompts, responses, token usage, and cost — with no application code changes required.
What You Are Configuring
- An AI Gateway named
bootcamp-lab - A Cloudflare API token with AI Gateway and Workers AI permissions
- A connection to the AI Gateway Explorer app
Step 1: Copy Your Account ID
- Go to dash.cloudflare.com
- Select your lab account
- Copy your Account ID from the URL bar — it is the string after
dash.cloudflare.com/:
https://dash.cloudflare.com/<your-account-id>/
- Save it somewhere safe — you will need it throughout this module
You can also find the Account ID on the Workers & Pages overview page in the right sidebar under Account details.
Step 2: Create an AI Gateway
- Navigate to AI > AI Gateway
- Click Create Gateway
- Enter the gateway name:
| Field | Value |
|---|---|
| Gateway name | bootcamp-lab |
- Before clicking Create, verify the following settings on the creation form:
| Setting | Value |
|---|---|
| Collect logs | Enabled |
| Authenticated Gateway | Enabled |
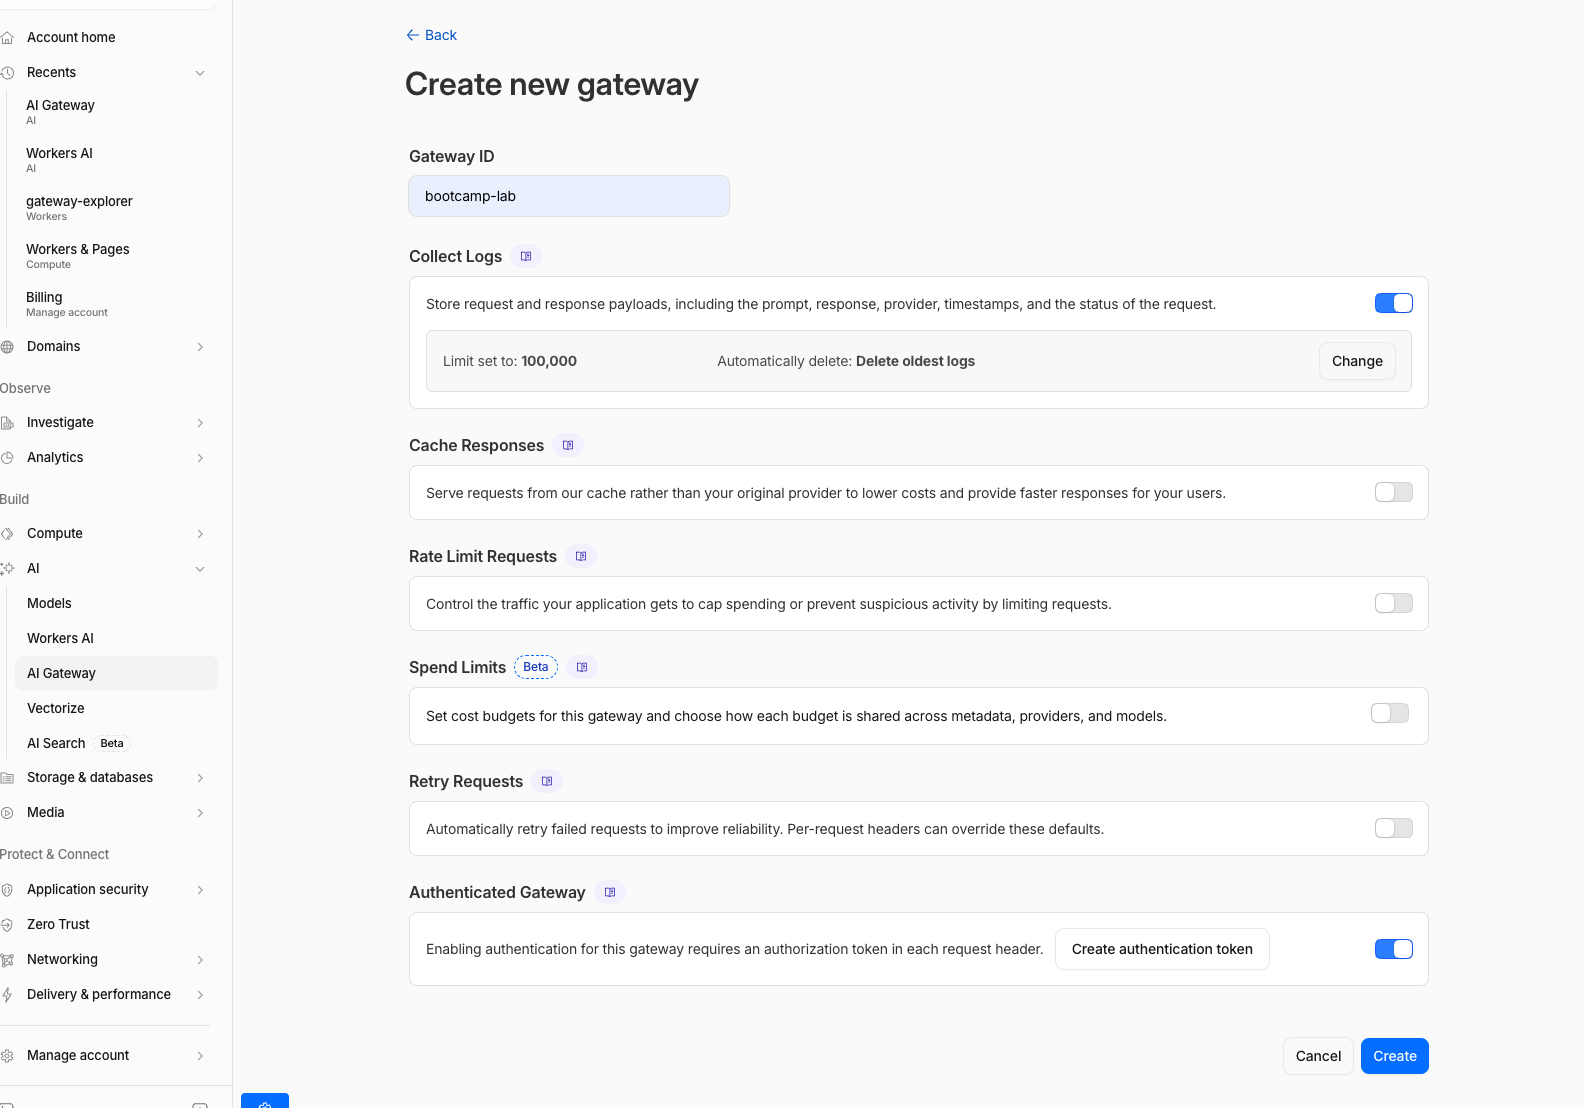
Leave Cache, Rate Limiting, and Spend Limits disabled for now. You will configure each of these in later sections of this module. Enabling them now may interfere with the guardrails and dynamic routing exercises.
- Click Create
Expected Result
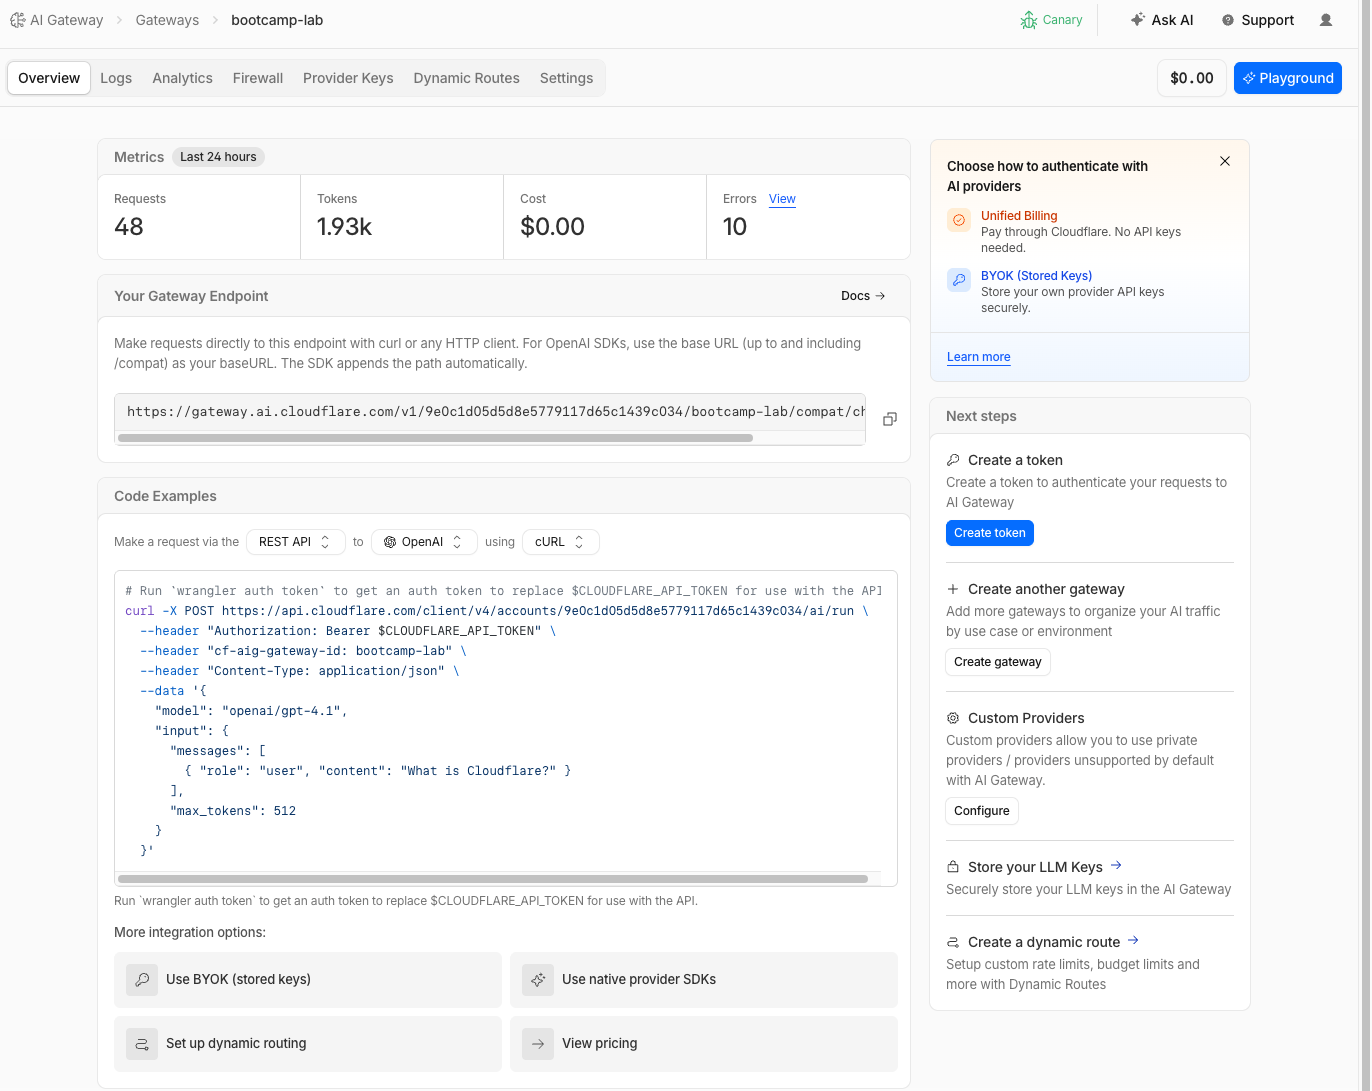
The gateway bootcamp-lab is created with log collection and authentication enabled. A Next steps panel appears on the right side of the dashboard with several options including Create a token.
Step 3: Create an API Token
Use the Next steps panel that appeared after creating the gateway to create an API token with the correct permissions.
- In the Next steps panel on the right, click the Create token button
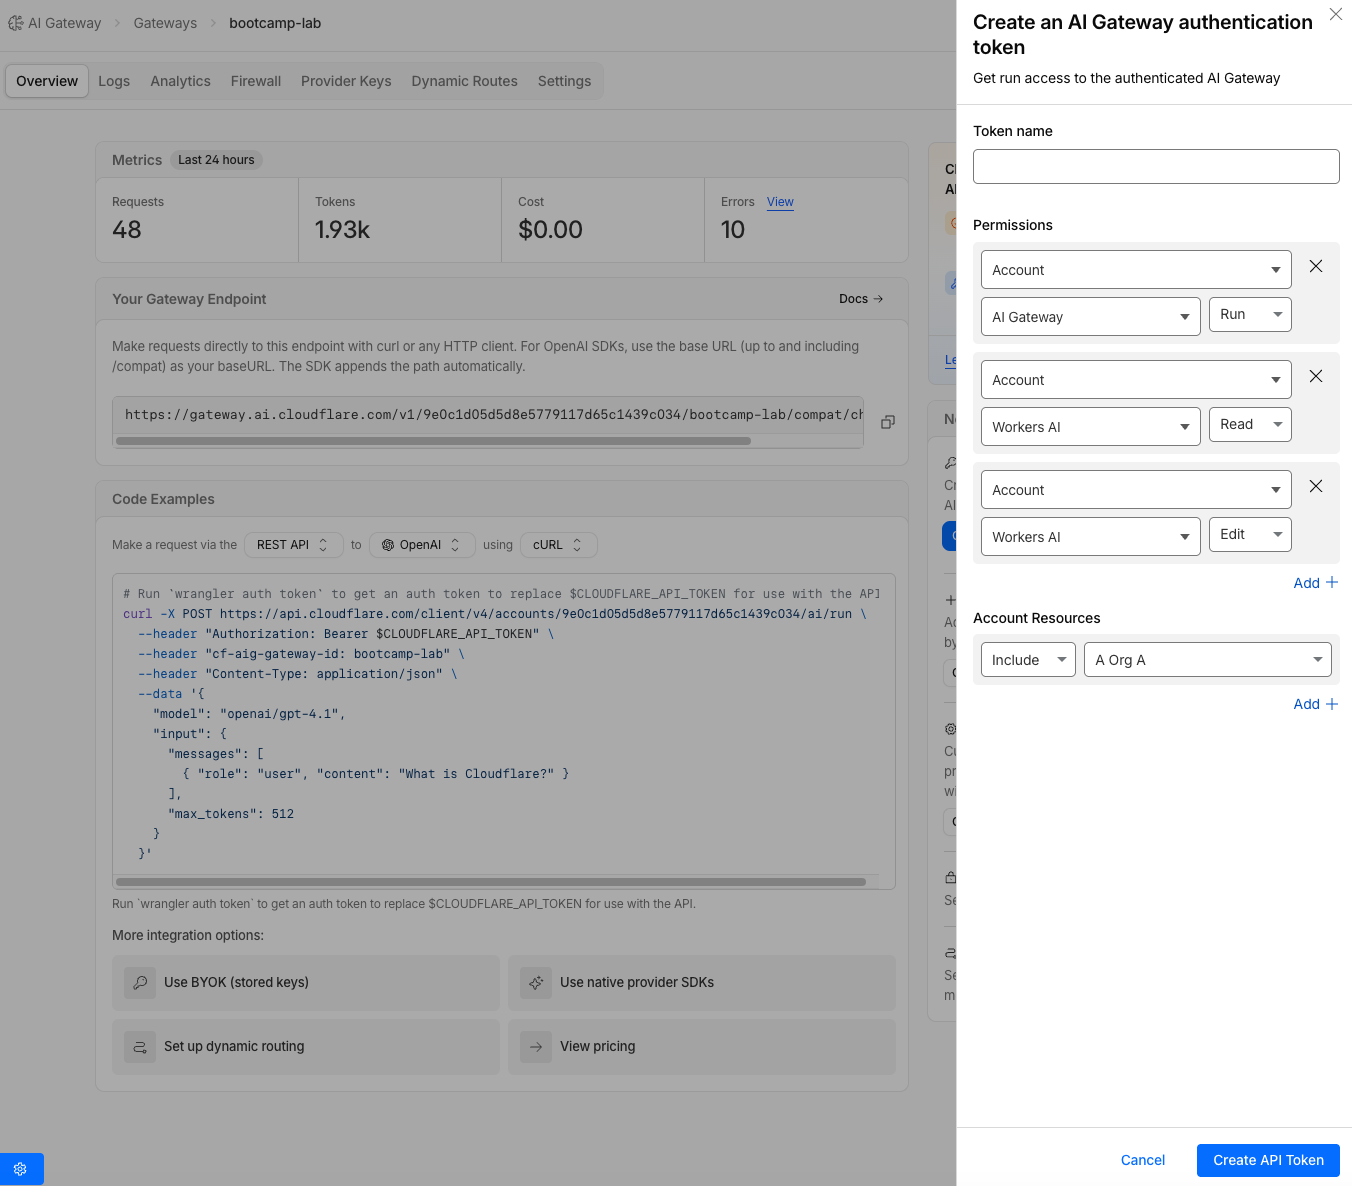
- Configure the token:
| Field | Value |
|---|---|
| Token name | Bootcamp AI Gateway |
| Permissions — Row 1 | AI Gateway — Run |
| Permissions — Row 2 | Workers AI — Read |
| Permissions — Row 3 | Workers AI — Edit |
| Account Resources | Include — your lab account |
- Click Continue to summary > Create Token
- Copy the token immediately — it will not be shown again
Save the API token somewhere safe (e.g., a text file). You will need it throughout this module. If you lose it, create a new one.
If you navigated away from the Next steps panel, you can create a token manually: click your profile icon (top-right) > My Profile > API Tokens > Create Token > Create Custom Token.
Expected Result
A new API token is created with AI Gateway - Run and Workers AI - Read & Edit permissions.
Step 4: Connect to the AI Gateway Explorer App
What is the Explorer App?
The AI Gateway Explorer is a Cloudflare Worker deployed by the facilitator that acts as a middleware proxy. It provides a simple UI for sending requests through your AI Gateway — no CLI or code required.
The request flow looks like this:
Your Browser → Instructor Worker (proxy) → api.cloudflare.com → Your AI Gateway → Workers AI
The Explorer app sends each request to the AI Gateway endpoint (gateway.ai.cloudflare.com/v1/{account_id}/{gateway_id}/compat/chat/completions) with your credentials attached. This is the same endpoint any application would call to use AI Gateway — the gateway ID is embedded in the URL path, and all gateway features (guardrails, DLP, caching, rate limiting, spend limits, dynamic routing) are applied automatically.
How AI Gateway integration works
Integrating AI Gateway uses the gateway compat endpoint at gateway.ai.cloudflare.com. The gateway ID is part of the URL path, and a single authentication header is needed:
| Header | Purpose |
|---|---|
cf-aig-authorization | Authenticates to your AI Gateway (required when Authenticated Gateway is enabled) |
cf-aig-metadata | (Optional) Attaches custom metadata (e.g., user ID, team, app name) for logging, filtering, and spend limit scoping |
For Workers AI models, the model name is prefixed with workers-ai/ (e.g., workers-ai/@cf/meta/llama-3.2-3b-instruct). For dynamic routes, the model name uses the dynamic/ prefix (e.g., dynamic/smart-route). Both use the same endpoint and authentication.
The Explorer app adds these headers for you automatically. The middleware Worker pattern demonstrated here is one common integration approach. Organisations can also:
- Call the API directly from their backend services using curl, Python, Node.js, or any HTTP client
- Use the Workers AI binding with a
gatewayoption:env.AI.run(model, params, { gateway: { id: "bootcamp-lab" } })
You can send requests directly to your AI Gateway without the Explorer app. Here is the equivalent curl command:
curl -X POST "https://gateway.ai.cloudflare.com/v1/$ACCOUNT_ID/bootcamp-lab/compat/chat/completions" \
  --header "cf-aig-authorization: Bearer $API_TOKEN" \
  --header "cf-aig-metadata: {\"user_id\": \"user-anna\"}" \
  --header "Content-Type: application/json" \
  --data '{
    "model": "workers-ai/@cf/meta/llama-3.2-3b-instruct",
    "messages": [{"role": "user", "content": "What are the best hikes near Wanaka?"}]
  }'
Replace $ACCOUNT_ID and $API_TOKEN with your values from Steps 1 and 3. Note the workers-ai/ prefix on the model name — this tells the gateway compat endpoint to route to Workers AI. The gateway ID (bootcamp-lab) is embedded in the URL path. The Explorer app is recommended for this lab as it provides a visual flow diagram and makes it easier to test different scenarios, but the curl command above does exactly the same thing.
Connect the Explorer App
- Open the AI Gateway Explorer app at the URL provided by the facilitator:
https://kiwi-aigw.mythingy.io
- Enter your credentials:
| Field | Value |
|---|---|
| Account ID | Your Account ID from Step 1 |
| API Token | Your API token from Step 3 |
| Gateway ID | bootcamp-lab |
- Set the User ID field to
user-anna

The User ID field is sent as cf-aig-metadata with every request: {"user_id": "user-anna"}. In production, this metadata would be injected automatically by an authentication Worker or extracted from a Cloudflare Access JWT — never by the end user directly. For this lab, manual entry lets you simulate different users hitting the same gateway.
Step 5: Send Your First Request
- In the Explorer app, the default prompt is pre-loaded: "What are the best hikes near Wanaka?"
- Verify the Model is set to
Llama 3.2 3B (small/cheap) - Click Send
- Wait for the response to appear in the response panel
- Observe the flow diagram on the right side of the Explorer app — it shows the request path through each AI Gateway stage
Expected Result
The response panel shows:
- Status:
200 - Model:
@cf/meta/llama-3.2-3b-instruct - Tokens In/Out/Total: token counts for the request and response
- Duration: response time in milliseconds
- The AI's answer about hiking near Wanaka
The flow diagram lights up green from top (User) to bottom (Workers AI), confirming the request passed through all gateway stages.
Step 6: Review Your First Log Entry
Now check that the request is visible in your AI Gateway logs.
- Go to dash.cloudflare.com
- Navigate to AI > AI Gateway
- Select your bootcamp-lab gateway
- Click the Logs tab
- Find your request in the log list
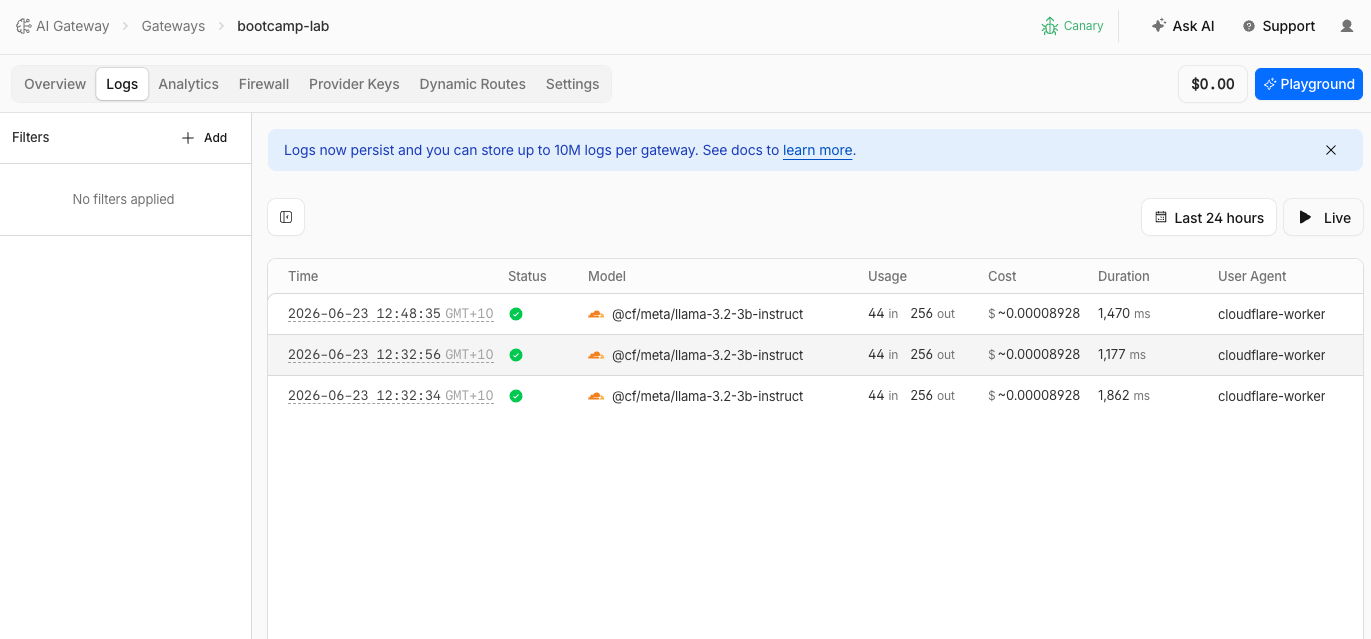
- Click the log entry to expand it. Review:
| Field | What You Should See |
|---|---|
| Prompt | The question you asked ("What are the best hikes near Wanaka?") |
| Response | The model's full answer |
| Model | @cf/meta/llama-3.2-3b-instruct |
| Provider | Workers AI |
| Tokens | Input, output, and total token counts |
| Cost | Estimated cost (e.g., $0.0001) |
| Duration | Request processing time |
| Metadata | user_id: user-anna |
| Status | Success |
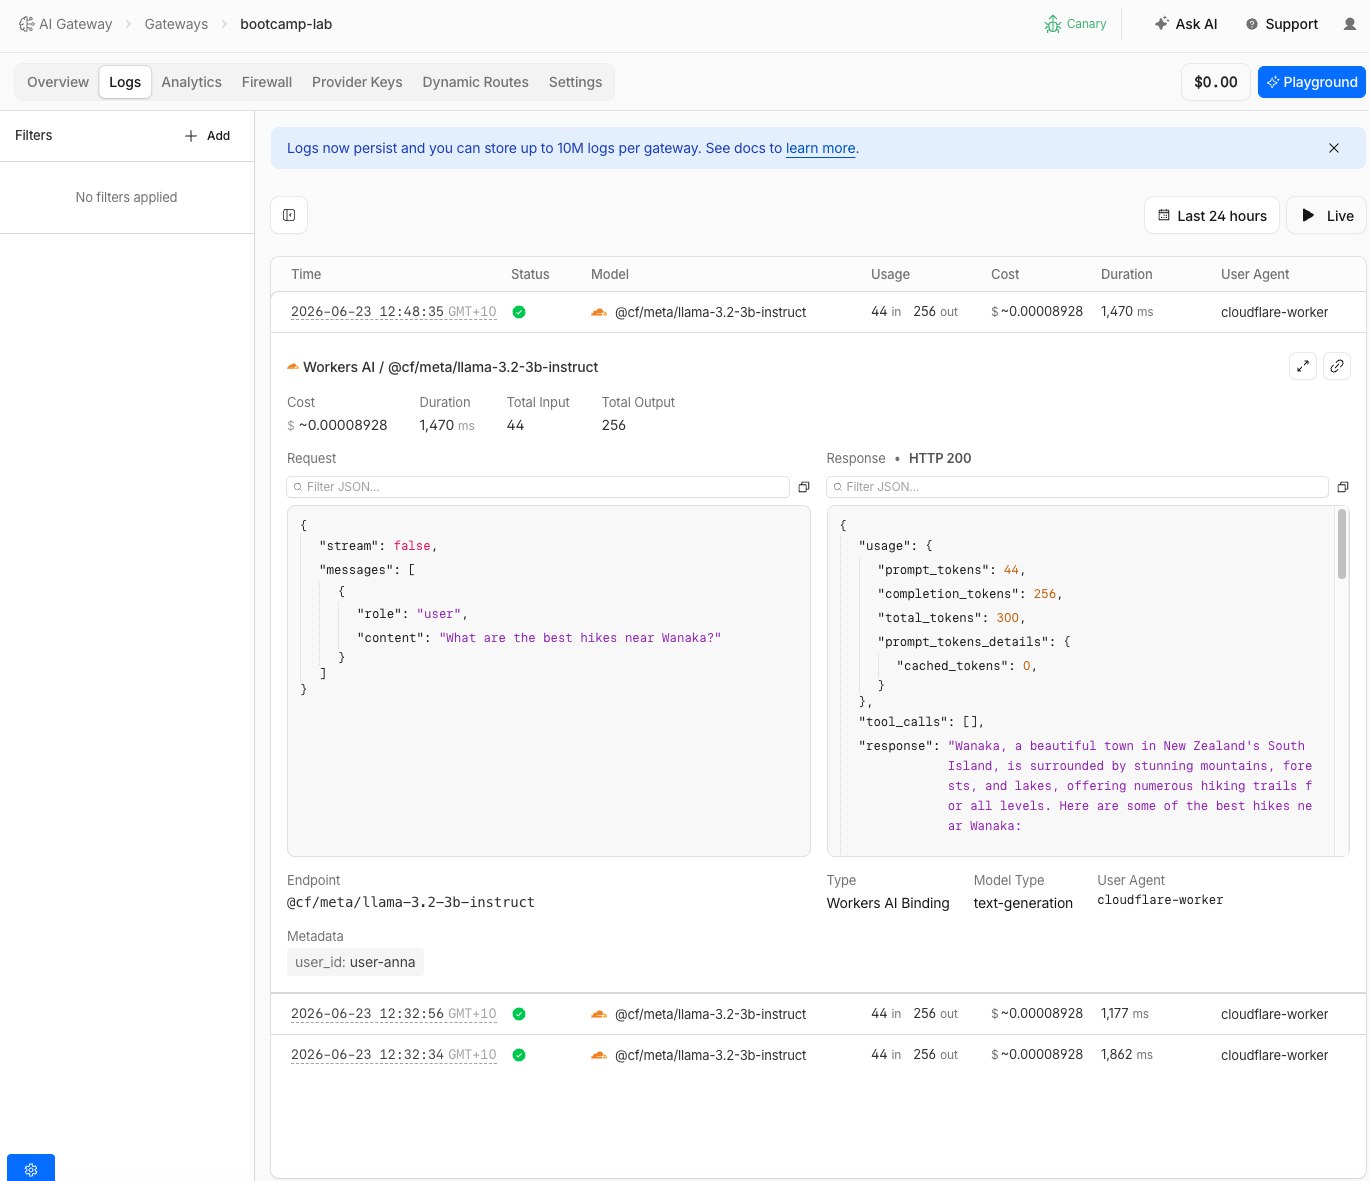
The metadata field user_id: user-anna is visible because the Explorer app sent it as cf-aig-metadata. In production, you can filter and search logs by any metadata key — useful for tracing requests back to a specific user, team, or application.
Step 7: Review Analytics
- Click the Analytics tab in your gateway
- Review the dashboard: You can navigate between different time periods using the time range selector (e.g., Last 1 Hour, Last 24 Hours, Last 7 Days) and select different metrics to view.
| Metric | What You Should See |
|---|---|
| Requests | 1 total request |
| Tokens | Token usage breakdown |
| Costs | Estimated cost of the request |
| Errors | 0 errors |
| Cached | Number of cached responses |
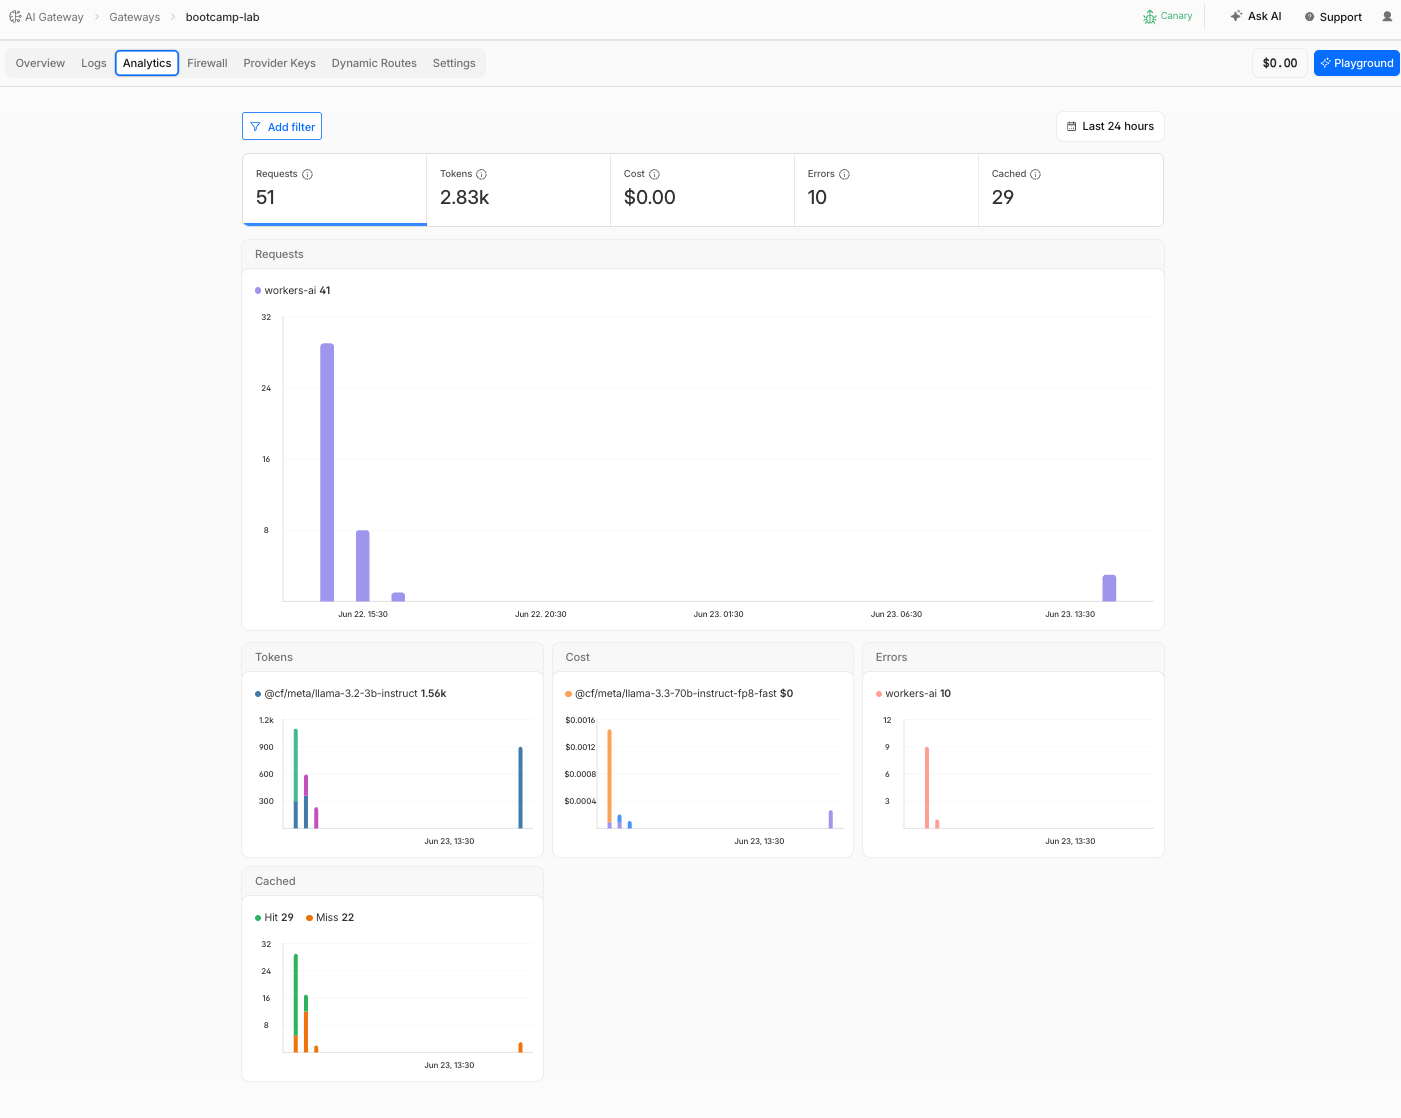
Expected Result
The analytics dashboard shows requests with token and cost data. This dashboard will populate further as you complete the remaining pages.
Validation
- Account ID copied
- Gateway
bootcamp-labcreated - API token created via the Next steps panel with
AI Gateway - EditandWorkers AI - Readpermissions - Explorer app connected with credentials and User ID set
- First request returned an AI response about Wanaka hikes
- Flow diagram in Explorer app showed green flow from User to Workers AI
- Log entry visible in gateway logs with prompt, response, tokens, cost, and
user_idmetadata - Analytics tab shows 1 request with token and cost data
Troubleshooting
Explorer app shows "Error — check credentials"
- Verify your Account ID is correct (check the dashboard URL)
- Verify the API token has both
AI Gateway - EditandWorkers AI - Readpermissions - Create a new token if unsure — old tokens cannot be viewed after creation
- Check that the Gateway ID matches exactly:
bootcamp-lab
Request returns 401 Unauthorized
- The API token may be missing the
Workers AI - Readpermission - Create a new token with both permissions
- Ensure you are using the correct account (not a different CF account)
No logs appearing in the gateway
- Logs may take 10–30 seconds to appear — refresh the page
- Verify the Gateway ID in the Explorer app matches the gateway name in the dashboard
- Check that Log collection is enabled in gateway settings (it is on by default)
Response is very slow (>30 seconds)
- Workers AI cold starts can take a few seconds on first request
- Try sending a second request — it should be faster
- If consistently slow, try switching to a smaller model
Next steps panel disappeared
- Navigate back to AI > AI Gateway > bootcamp-lab — the panel may reappear
- If not, create a token manually: profile icon (top-right) > My Profile > API Tokens > Create Token > Create Custom Token with
AI Gateway - EditandWorkers AI - Readpermissions