Cost Controls — Caching, Rate Limiting & Spend Limits
Task
Enable caching, rate limiting, and spend limits to control AI inference costs at the gateway level.
Why
AI inference costs can spike unpredictably — a single runaway application, a burst of traffic, or one team's heavy usage can burn through budget. AI Gateway enforces cost guardrails at the infrastructure level, with no application code changes needed.
What You Are Configuring
- Caching — serve identical prompt responses from cache at $0 cost
- Rate limiting — cap the number of requests in a time window
- Spend limits — set dollar-amount budgets scoped by model, provider, or user
Step 1: Enable Caching
- Navigate to AI > AI Gateway > bootcamp-lab > Settings
- Under Cache Responses, toggle to ON
- Set the TTL (time to live) to
300seconds (5 minutes)
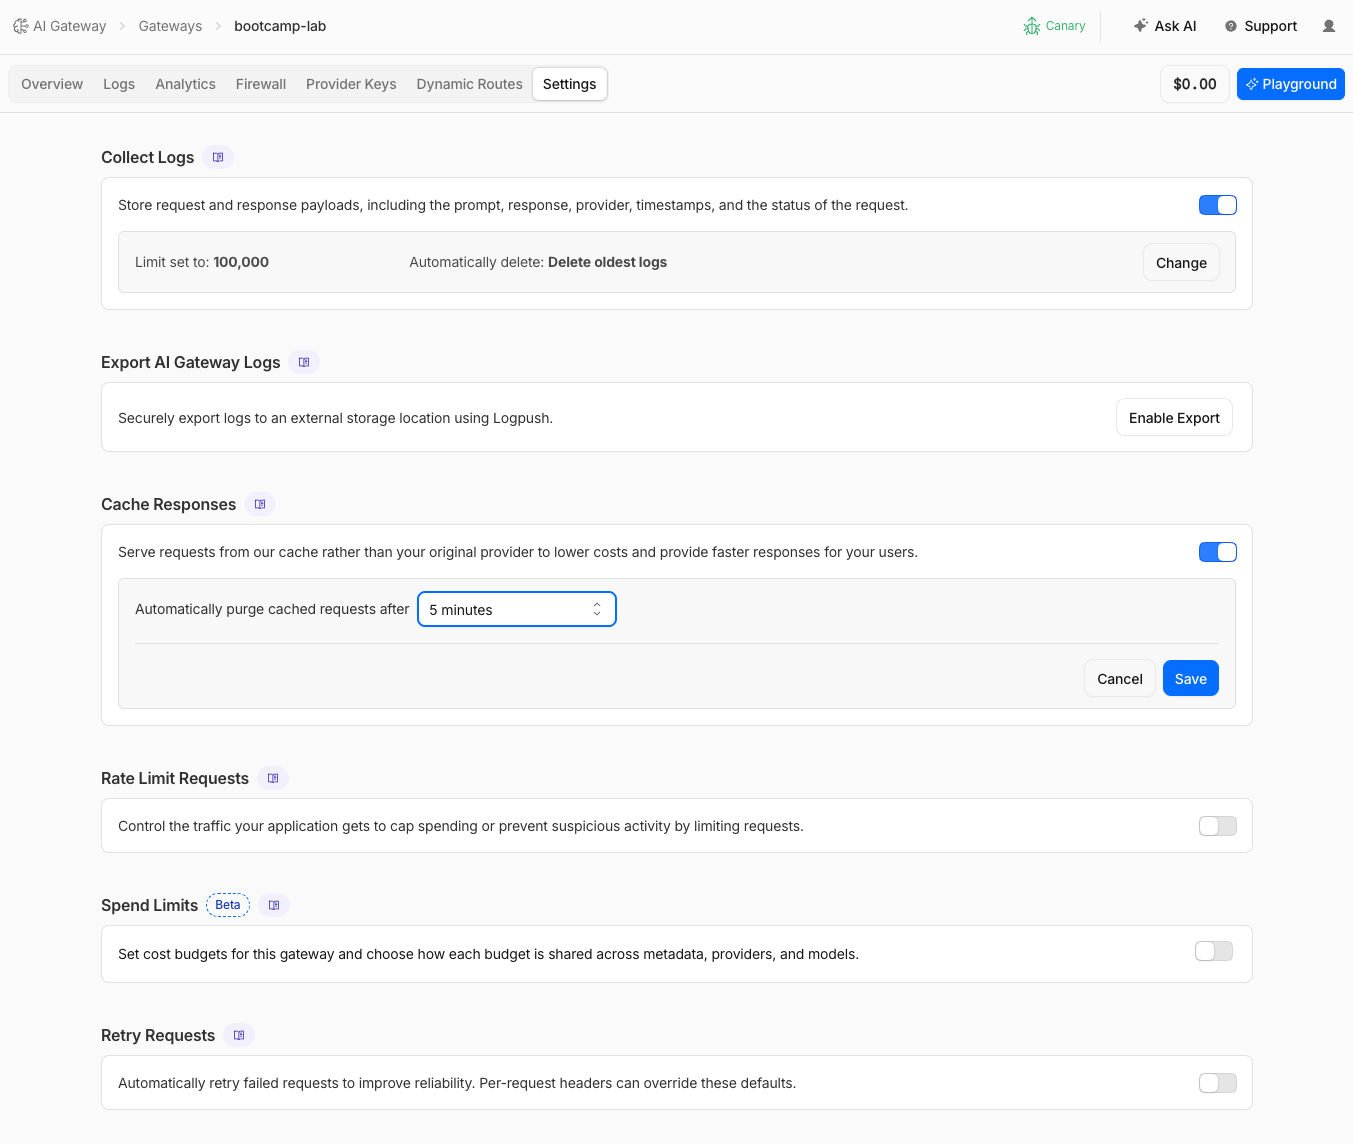
- Click Save
AI Gateway caches responses using a SHA-256 hash of the provider + endpoint + model + auth header + full request body. If an identical request arrives within the TTL, the cached response is served instantly at $0 cost. Cache keys are exact-match — even a single character difference in the prompt produces a different key.
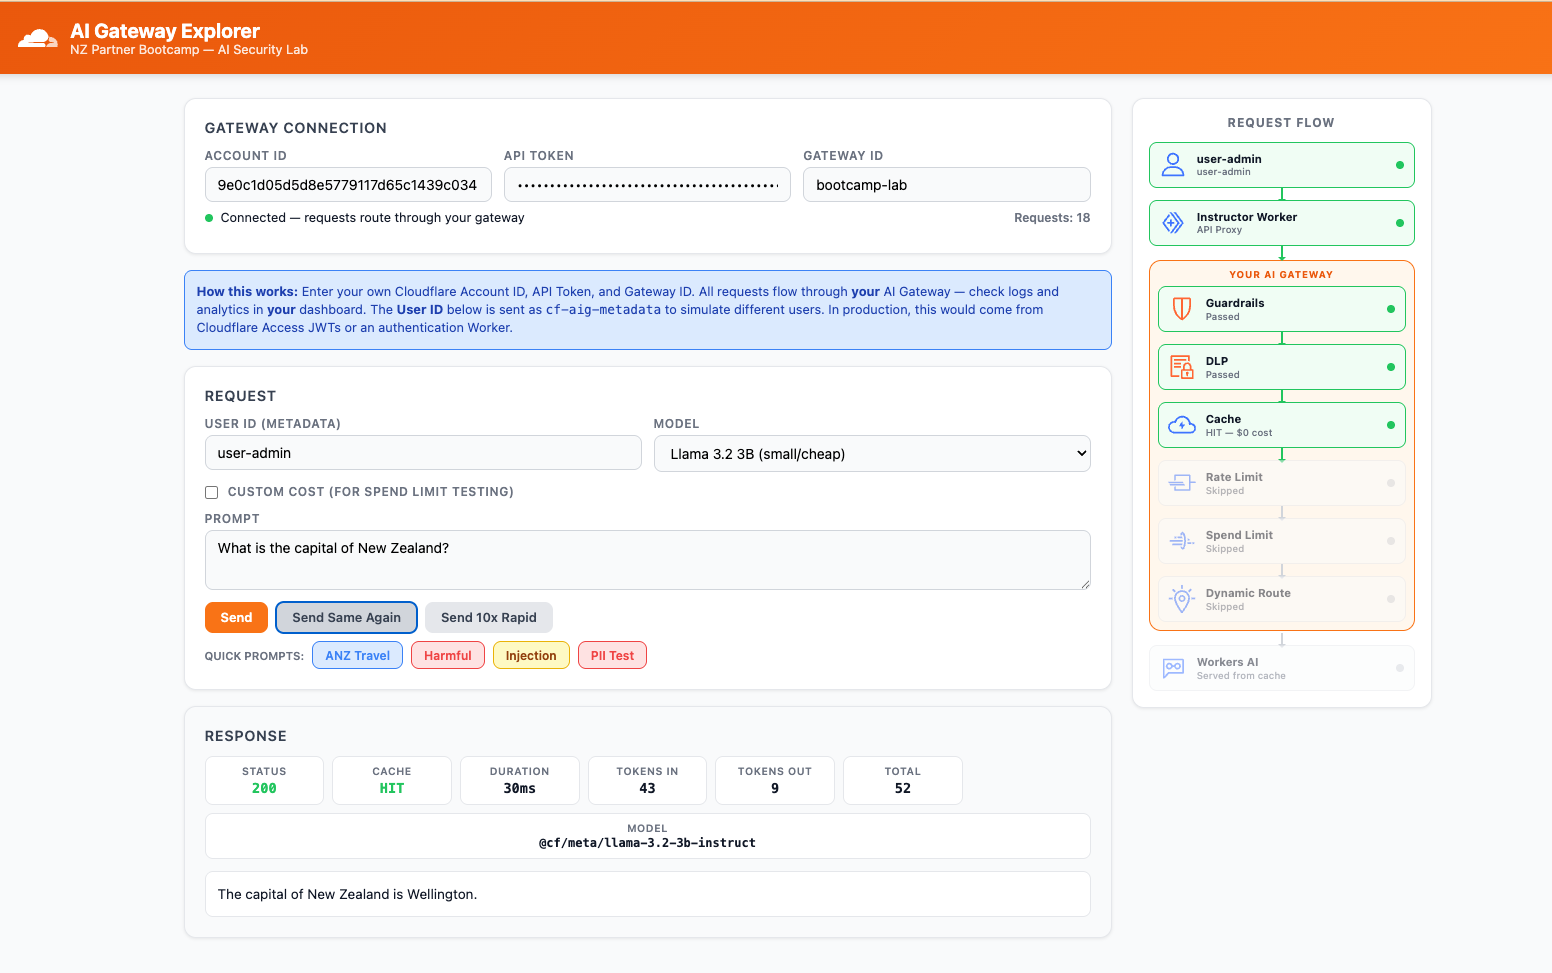
Step 2: Test Caching — Observe HIT vs MISS
Make sure to unctick the custom cost checkbox before sending the request.
- In the AI Gateway Explorer app, set User ID to
user-anna - Set Model to
Llama 3.2 3B (small/cheap) - Type a prompt: "What is the capital of New Zealand?"
- Click Send — note the response in the panel
- Now click Send Same Again — this resends the exact same prompt
Expected Result
| Request | Cache Status | Cost | Duration |
|---|---|---|---|
| First | MISS | $0.000x | Longer (inference runs) |
| Second | HIT | $0.00 | Much faster (served from cache) |
The Explorer app shows the cache status in the response panel. The second request is noticeably faster and costs nothing.
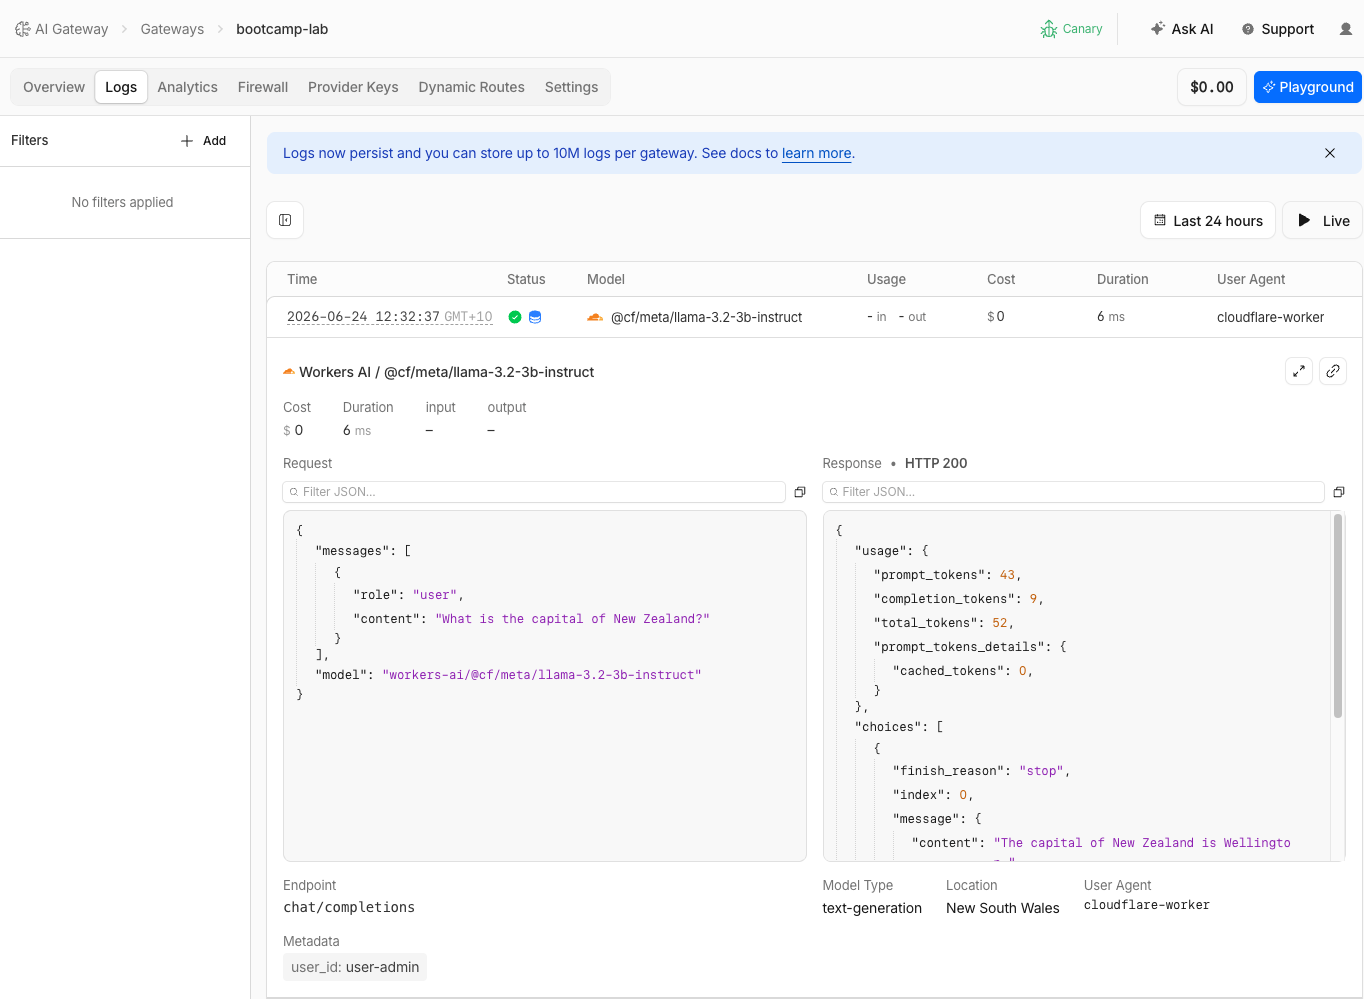
Step 3: Verify Cache HIT in Logs
- Navigate to AI > AI Gateway > bootcamp-lab > Logs
- Find the two requests you just sent
- Compare them:
| Field | First Request | Second Request |
|---|---|---|
| Status | Success | Cache |
| Cost | $0.000x | $0.00 |
| Tokens | Token counts shown | Same token counts |
The second request shows status Cache (with hard drive icon ), confirming it was served from the AI Gateway cache.
Step 4: Disable Caching & Enable Rate Limiting
Before testing rate limiting, disable caching so each request counts against the rate limit, then configure the rate limit.
- Navigate to AI > AI Gateway > bootcamp-lab > Settings
- Under Cache Responses, toggle to OFF
Cached responses are served directly from the gateway without counting against the rate limit. If caching is still enabled from the previous exercise, the "Send 10x Rapid" button will serve most requests from cache and the rate limit will never trigger. Disable caching to ensure each request reaches the model and counts toward the quota.
In production, caching and rate limiting work together — cached responses are fast and free, while rate limiting controls the volume of new requests that reach the model.
- Under Rate Limiting, configure:
| Field | Value |
|---|---|
| Requests | 5 |
| Time window | 60 seconds |
| Technique | Sliding window |
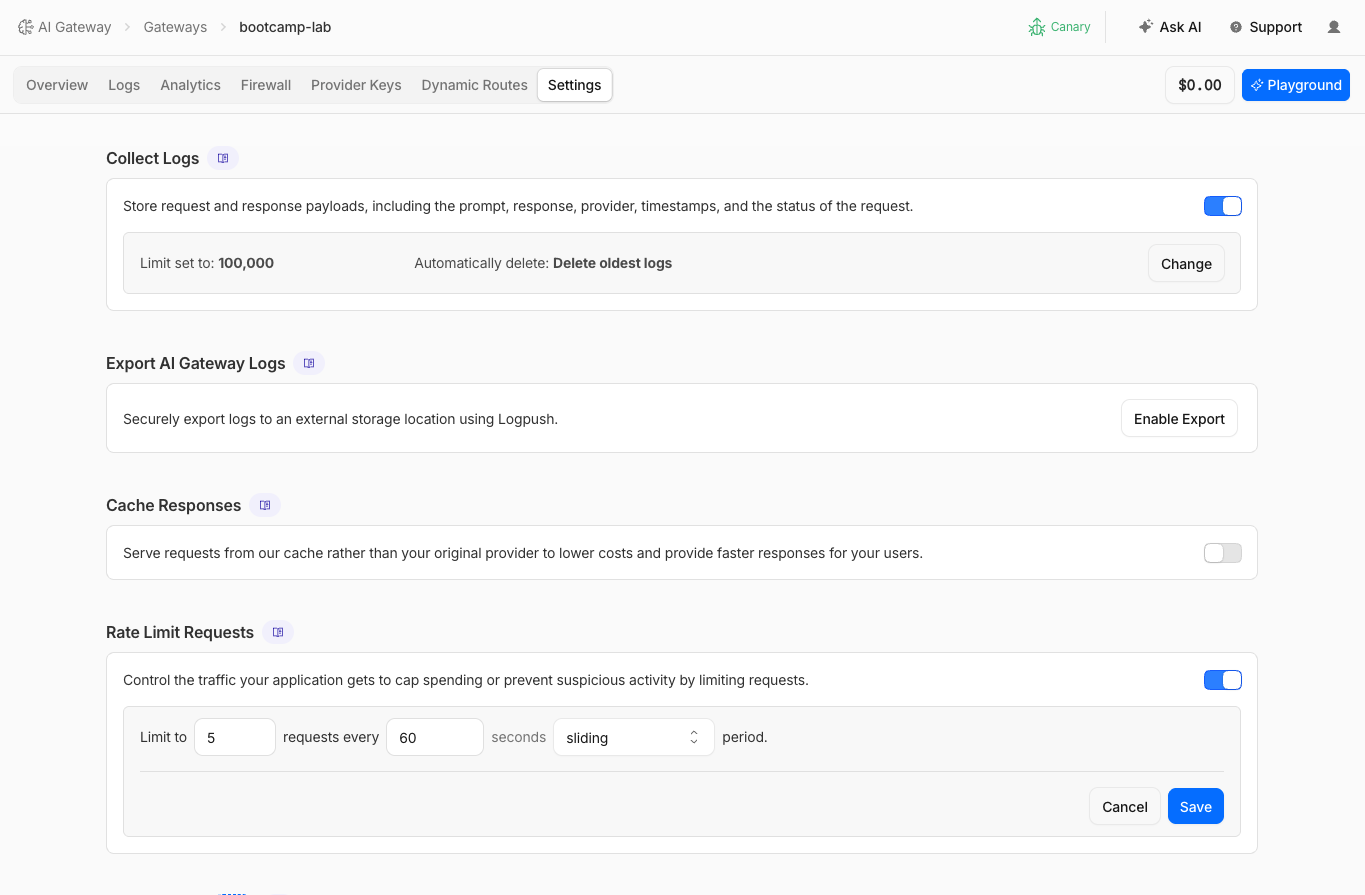
- Click Save
- Fixed window: resets every N seconds on a clock boundary. You could send 5 requests at 12:00:59 and 5 more at 12:01:01.
- Sliding window: evaluates the last N seconds from each request. More consistent enforcement — use this for the lab.
Step 5: Trigger the Rate Limit
- In the Explorer app, click Send 10x Rapid
- Watch the results panel
Expected Result
The first 5 requests succeed (status 200). Starting from request 6, you see 429 Too Many Requests.
Step 6: Verify Rate Limit in Logs
- Go to Logs
- Find the rate-limited requests — they show Error status
- Click to expand a rate-limited entry:
| Field | What You Should See |
|---|---|
| Status | Error |
| Error message | Rate limited |
| Tokens | 0 (no inference was performed) |
| Cost | $0.00 (no cost incurred) |
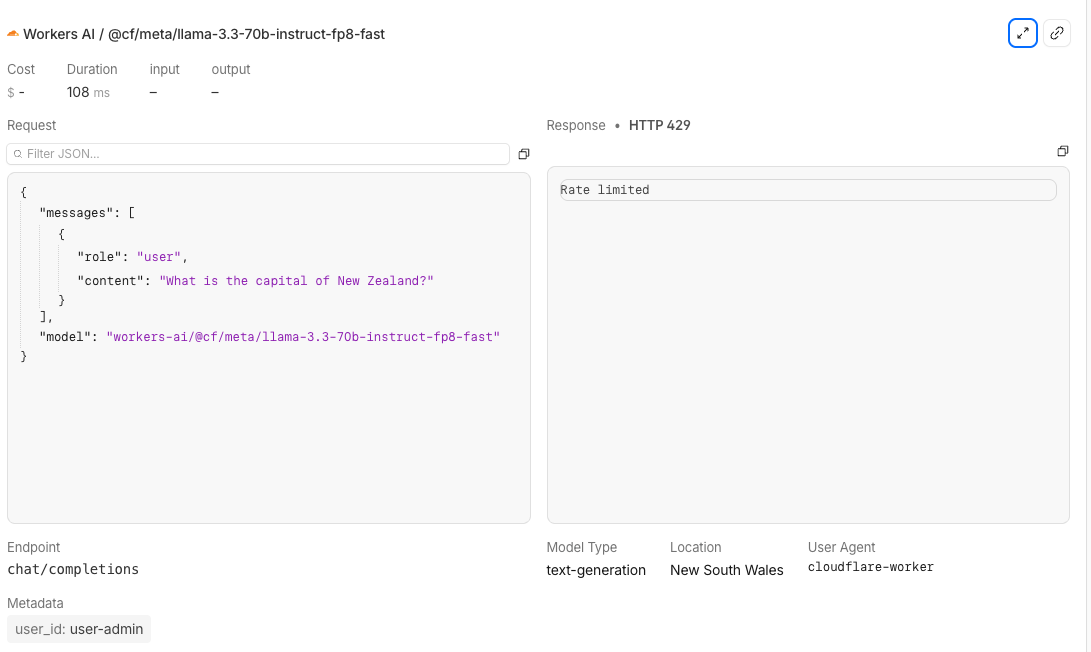
Rate-limited requests consume zero tokens and incur zero cost. The request is rejected before it reaches the AI model.
Step 7: Create a Global Spend Limit
Spend limits track actual dollar cost — not request counts — and block requests when the budget is exhausted.
We will keep it simple and global for now across all the providers, models and irrespective of the user.
- Navigate to AI > AI Gateway > bootcamp-lab > Settings
- First, toggle OFF the rate limit so it does not interfere with spend limit testing
- Toggle ON Spend Limits, then click Add Rule
- Configure:
| Field | Value |
|---|---|
| Budget | $1 |
| Time window | 1 hour |
| Window technique | Sliding window |
| Dimensions | None (global — applies to all requests) |
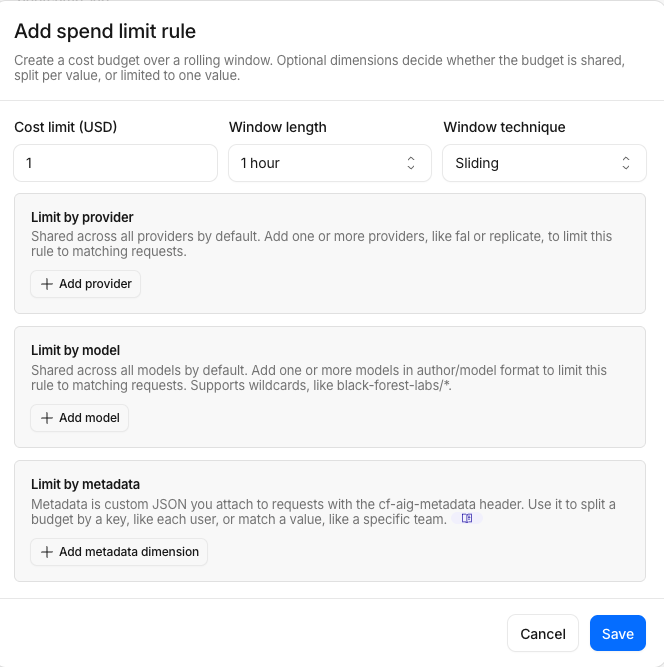
- Click Save
Step 8: Test the Global Spend Limit
Workers AI costs are fractions of a cent per request. To trigger spend limits quickly, enable the Custom Cost toggle in the Explorer app (Token In: $0.20, Token Out: $0.20). This overrides the per-token pricing so each request "costs" ~$50 in the gateway's accounting. See the Custom Cost Override section in the Dynamic Routing page for details on this feature and its real-world use cases.
Disable the toggle after testing.
- In the Explorer app, enable the Custom Cost toggle (Token In:
$0.20, Token Out:$0.20) - Send a prompt — the inflated cost will exceed the $0.01 budget in a single request
- Send a second prompt
- Observe: the second request returns
429
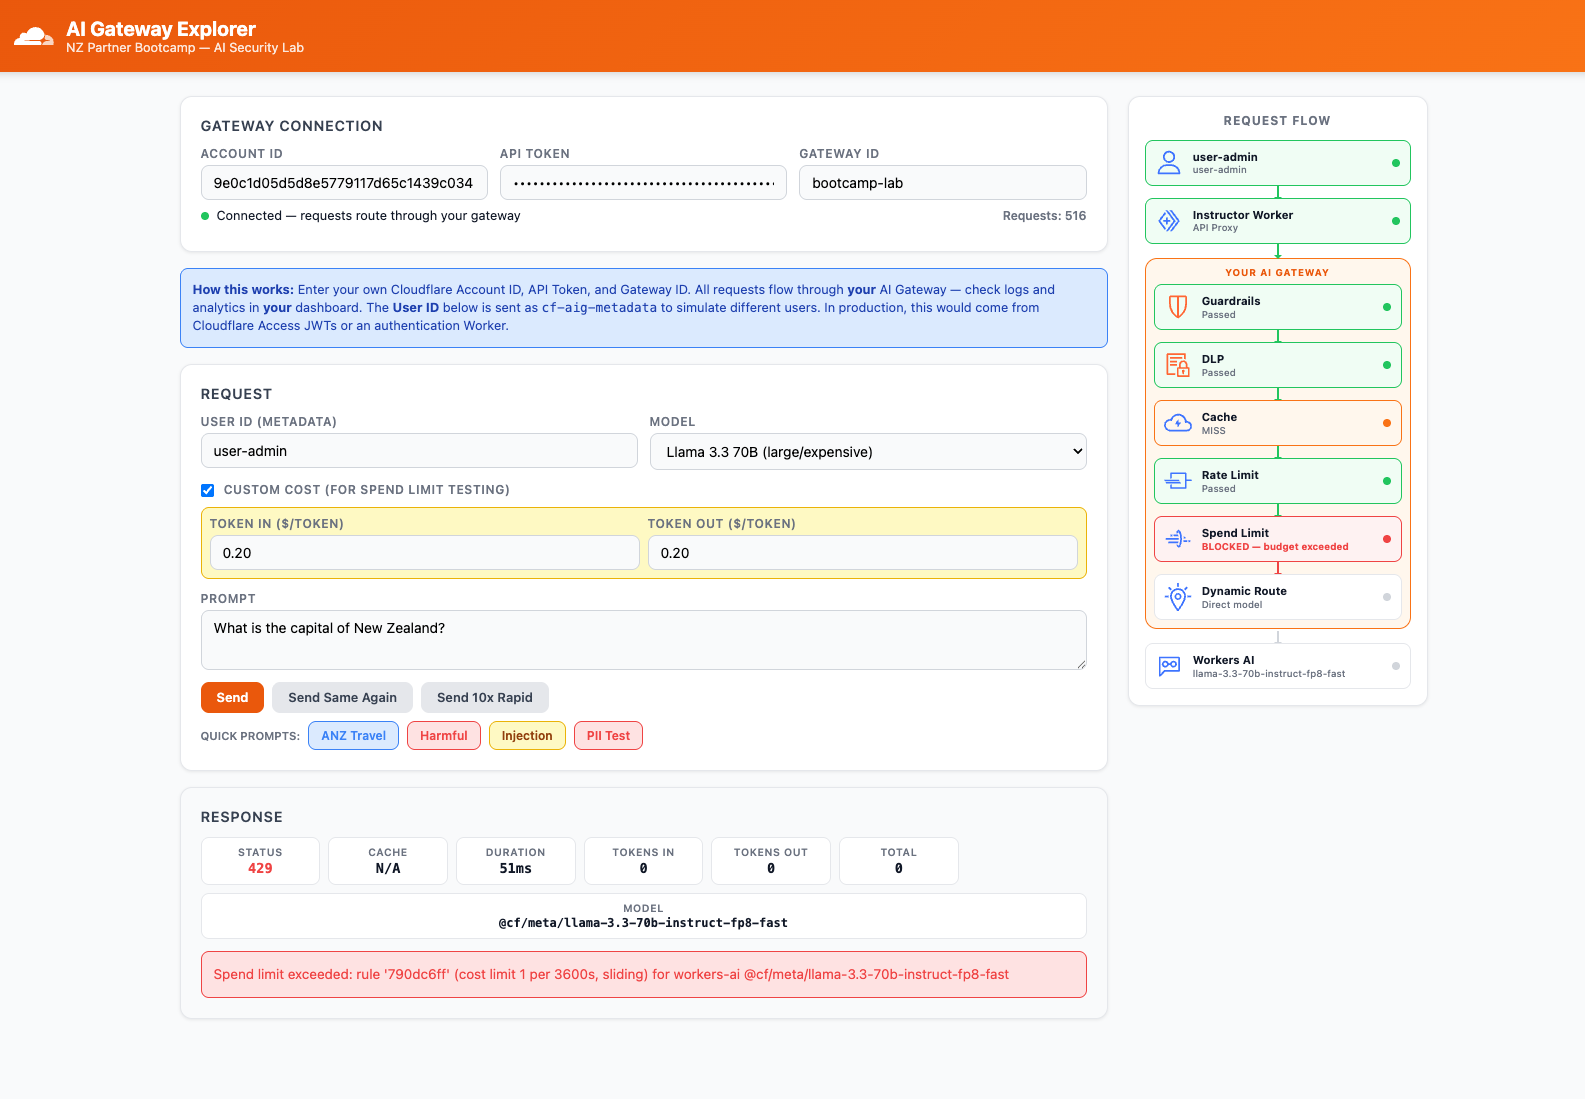
- Disable the Custom Cost toggle after testing
Expected Result
The first request succeeds (with inflated cost shown in logs). The second request is blocked with 429 because the spend limit has been exceeded.
Step 9: Verify Spend Limit in Logs
- Go to Logs and find the blocked request
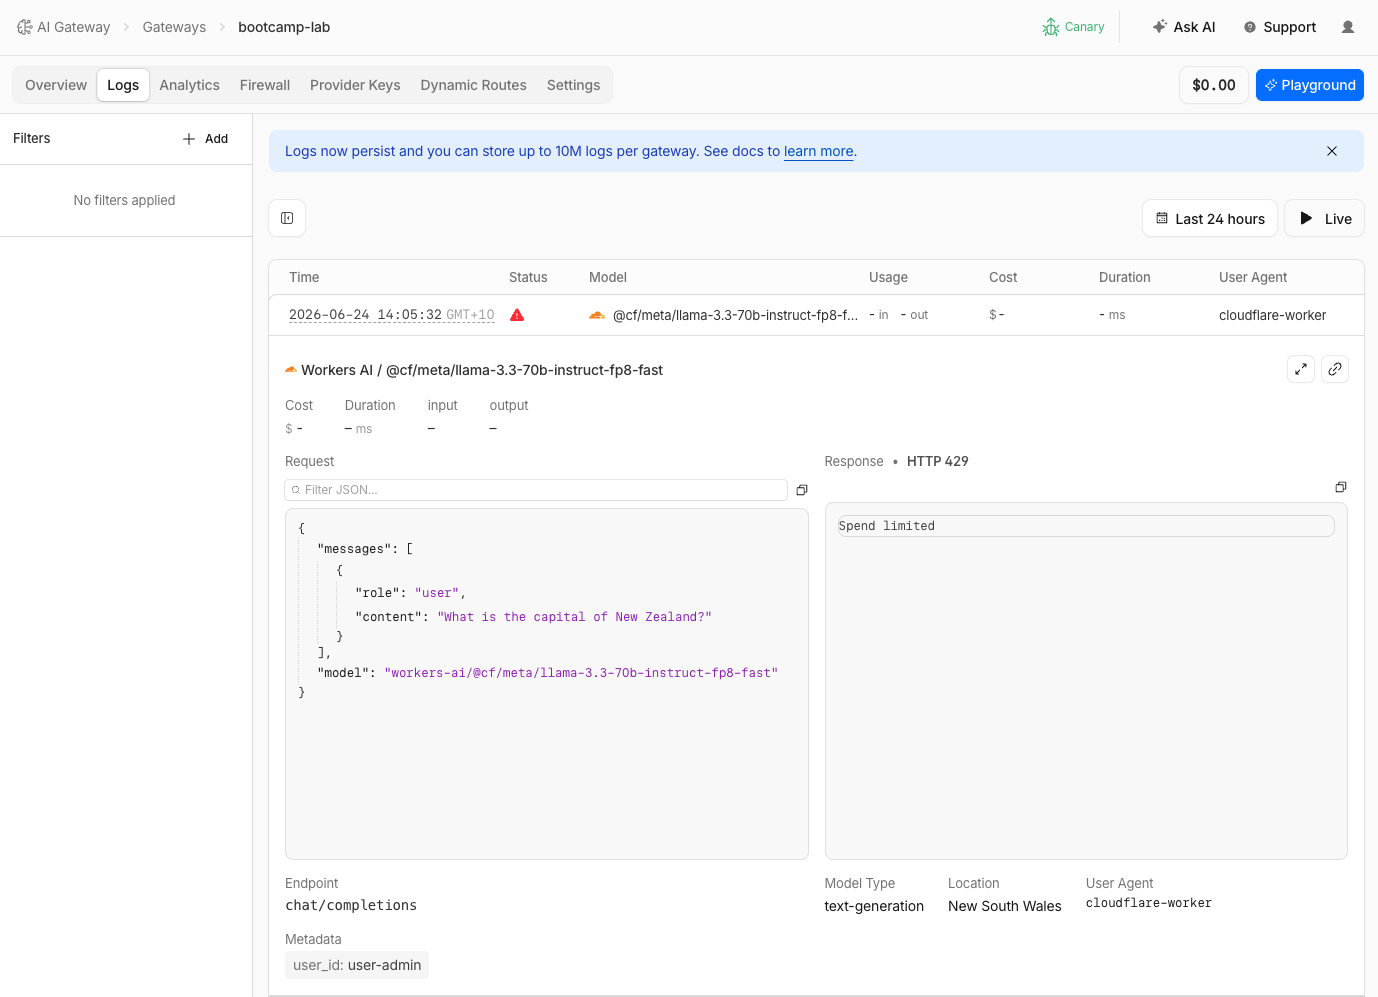
- Switch to the Analytics tab to see the cumulative cost graph approaching the $0.01 limit
Step 10: Create a Per-User Spend Limit
The global limit blocks everyone when the total budget runs out. A per-user limit gives each user their own budget.
- Go to Spend Limits settings
- Edit the existing rule or Add a new rule:
| Field | Value |
|---|---|
| Budget | $1 |
| Time window | 1 hour |
| Dimensions | metadata.user_id → Split by key |
Split by key means that each user would have their own spend counter.
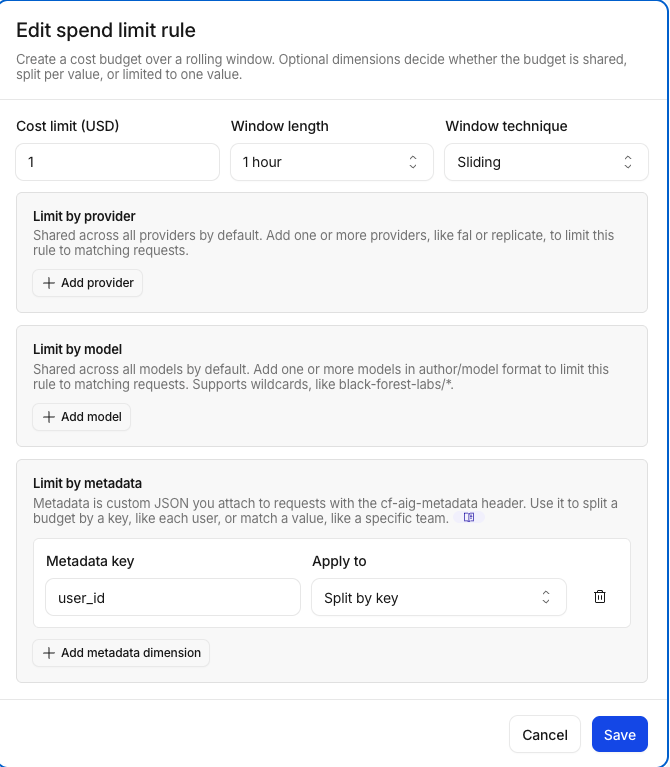
- Click Save
Step 11: Test Per-User Budget Isolation
- In the Explorer app, enable the Custom Cost toggle if not already enabled (Token In:
$0.20, Token Out:$0.20) - Set User ID to
user-anna - Send multiple prompts until Anna's budget is exhausted
- Now switch User ID to
user-bob - Send a prompt
Expected Result
user-anna→ blocked (429) — her budget is exhausteduser-bob→ succeeds — he has his own fresh budget/counter anduser-annarequests don't contribute to his budget
Step 12: Verify Per-User Budget Isolation in Logs
- Go to Logs
- If the log filter supports metadata, filter by
user_id:user-annarequests: mix of Success and Error (blocked after budget)user-bobrequests: Success after Anna's budget is exhausted
This is the answer to: "How do I give each team a budget without one team burning through everyone else's allocation?" Per-user (or per-team, per-app) spend limits with the Split by key dimension. Each dimension value gets its own independent budget bucket.
Step 13: Review Everything in Logs (Module Recap)
You have now configured every AI Gateway feature across this module. Take a moment to review the full log history.
- Go to Logs and remove all filters to see everything
- Scan the Status column — you should see a mix of:
| Status | Cause | Module Page |
|---|---|---|
| Success | Normal requests | All pages |
| Cache | Served from cache | This page (Step 2) |
| Error | Rate limited (code 2003) | This page (Step 5) |
| Error | Spend limit exceeded (429) | This page (Step 8–11) |
| Error | Guardrail blocked (code 2016) | Page 2 |
| Error | DLP blocked | Page 2 |
- Click through several entries to see:
- Guardrail blocks with safety category details
- DLP blocks with matched profile information
- Dynamic routing model switches (70B → 1B)
- Cache HITs at $0 cost
- Rate-limited requests at $0 cost
- Per-user metadata on every request
- Switch to Analytics to see the full picture:
| Metric | What It Shows |
|---|---|
| Requests | Total requests sent across the module |
| Tokens | Token usage by model |
| Costs | Total spend with cache savings visible |
| Cache hit rate | Percentage of requests served from cache |
| Errors | Breakdown of rate-limited, spend-limited, guardrail, and DLP blocks |
Customer Talk Track
"How do I prevent a runaway AI bill? Three layers. Caching eliminates cost on repeat queries — same question, same answer, zero cost. Rate limiting caps throughput so a burst of traffic cannot blow through your budget in seconds. And spend limits set per-user or per-team dollar budgets that enforce automatically. All configured in the dashboard, no code changes, and every decision is logged."
Congratulations
You have completed the AI Gateway Operations module. Here is everything you built:
| Feature | What It Does | How You Configured It |
|---|---|---|
| Gateway + Logs | Full observability of every AI call | Created gateway, reviewed logs with prompt/response/tokens/cost/metadata |
| Guardrails | Block harmful content and prompt injection | Llama Guard 3: block violence, hate, injection; flag others |
| DLP | Block PII in prompts | Financial Information profile with block action on requests |
| Dynamic Routing | Conditional model selection, budget fallback | Route: admin → 70B (with budget fallback), default → 3B. A/B percentage routing available via API (beta). |
| Caching | Serve repeat prompts at $0 | Enabled with 300s TTL |
| Rate Limiting | Cap request throughput | 5 req / 60s sliding window |
| Spend Limits | Per-user dollar budgets | $0.005/hr split by metadata.user_id |
Architecture
Partner (Explorer App)
  │
  ├── metadata: { user_id: "user-anna" }
  │
  ▼
AI Gateway (bootcamp-lab)
  ├── Guardrails ──── block harmful prompts + prompt injection (Llama Guard 3)
  ├── DLP ─────────── block PII in prompts (Financial Info profile)
  ├── Cache ────────── serve repeat prompts at $0
  ├── Rate Limit ──── cap request throughput
  ├── Spend Limit ─── per-user dollar budgets
  └── Dynamic Route ─ smart-route
       ├── user-admin → Budget($0.01) → 70B → fallback 1B
       └── default ───→ 1B model
  │
  ▼
Workers AI (inference)
Validation
- Caching enabled — cache HIT observed on duplicate prompt with $0 cost
- Cache status visible in logs (Success vs Cache)
- Rate limiting configured —
429triggered after exceeding 5 requests/minute - Rate-limited requests show error code
2003in logs with $0 cost - Global spend limit ($0.01) — requests blocked when budget exhausted
- Per-user spend limit ($0.005) —
user-annablocked whileuser-bobstill succeeds - Per-user budget isolation visible in logs
- Combined log view reviewed — all status types visible (Success, Cache, Error)
- Analytics dashboard reviewed — requests, tokens, costs, cache hit rate
- Can explain the three cost control layers (caching, rate limiting, spend limits) to a customer
Troubleshooting
Cache always shows MISS
- The prompt text must be identical — even a trailing space creates a different cache key
- Use the Send Same Again button to ensure exact same prompt
- Verify caching is enabled in gateway settings
- Check that the TTL has not expired (default 300s)
- Different User IDs with the same prompt will still produce the same cache key (metadata is not part of the cache key)
Rate limit not triggering
- The window may be too large — ensure it is set to 60 seconds
- Cached responses may not count against the rate limit — send unique prompts
- Verify you selected Sliding window technique
- Try reducing the limit to 3 requests to make it easier to trigger
Spend limit not enforcing
- Spend limit tracking is eventually consistent — a burst of concurrent requests may briefly exceed the limit
- The $0.01 budget may not be reached yet — send more unique prompts (cached prompts cost $0)
- Verify the rule was saved
- Check that the time window has not already reset
Per-user spend limit not isolating users
- Verify the dimension is set to
metadata.user_idwith Split by key - Ensure the User ID field in the Explorer app is set to different values for each user
- Check the logs — both users should have distinct
user_idmetadata values