DLP AI Prompt Protection
Overview
Gemini is allowed, but you still need to control what employees send to it. In this step you'll set up DLP payload encryption, create a policy that blocks sensitive prompts to Gemini using AI prompt protection profiles, enable prompt-content logging, and learn how to decrypt captured prompts for investigation.
Architecture Context
Employee → Gemini (prompt) → Gateway DLP scans prompt content
                                ├─ Clean prompt → Allowed
                                └─ Sensitive data (PII, financial, SSN) → BLOCKED
                                     └─ Prompt logged (encrypted with your public key)
What You Are Configuring
- A DLP payload encryption key pair (public + private)
- A Gateway HTTP policy that blocks sensitive prompts to Gemini
- AI prompt-content logging
- Prompt log decryption for investigation
Step 1: Generate a Key Pair
Before DLP can log captured prompts, you need a public/private key pair. Cloudflare encrypts prompt logs with your public key so only you can decrypt them.
To save time in this lab, you can use the pre-generated key pair below instead of generating your own:
{
  "private_key": "wON7tyyHwnBsCjrGbSWZiVUNVXATwoLXWVW8ArRjoUk=",
  "public_key": "6XyhYI+7Y4aBilrNzuVktujxuazPeCGoJwNghIDlXis="
}
Skip to Step 2 if using the provided keys.
Alternative: Generate your own key pair
-
Download the matched-data-cli tool:
- Go to github.com/cloudflare/matched-data-cli/releases
- Download the version for your platform (Windows, macOS, or Linux)
- Extract the archive
-
Open a terminal / command prompt and run:
./matched-data-cli generate-key-pair
- You will see output like:
{
  "private_key": "wON7tyyHwnBsCjrGbSWZiVUNVXATwoLXWVW8ArRjoUk=",
  "public_key": "6XyhYI+7Y4aBilrNzuVktujxuazPeCGoJwNghIDlXis="
}
- Save the private key somewhere safe (you'll need it to decrypt logs later)
- Copy the public key — you'll paste it into Cloudflare in the next step
If you lose the private key, you cannot decrypt any previously captured prompt logs. Cloudflare does not have access to your private key and cannot recover it.
Step 2: Upload the Public Key to Cloudflare
- Go to one.dash.cloudflare.com
- Navigate to Data Loss Prevention > DLP settings
- Find the DLP Payload Encryption public key field
- Paste your public key
- Enable AI Context Analysis
- In Payload log masking, select Clear text
- Click Save
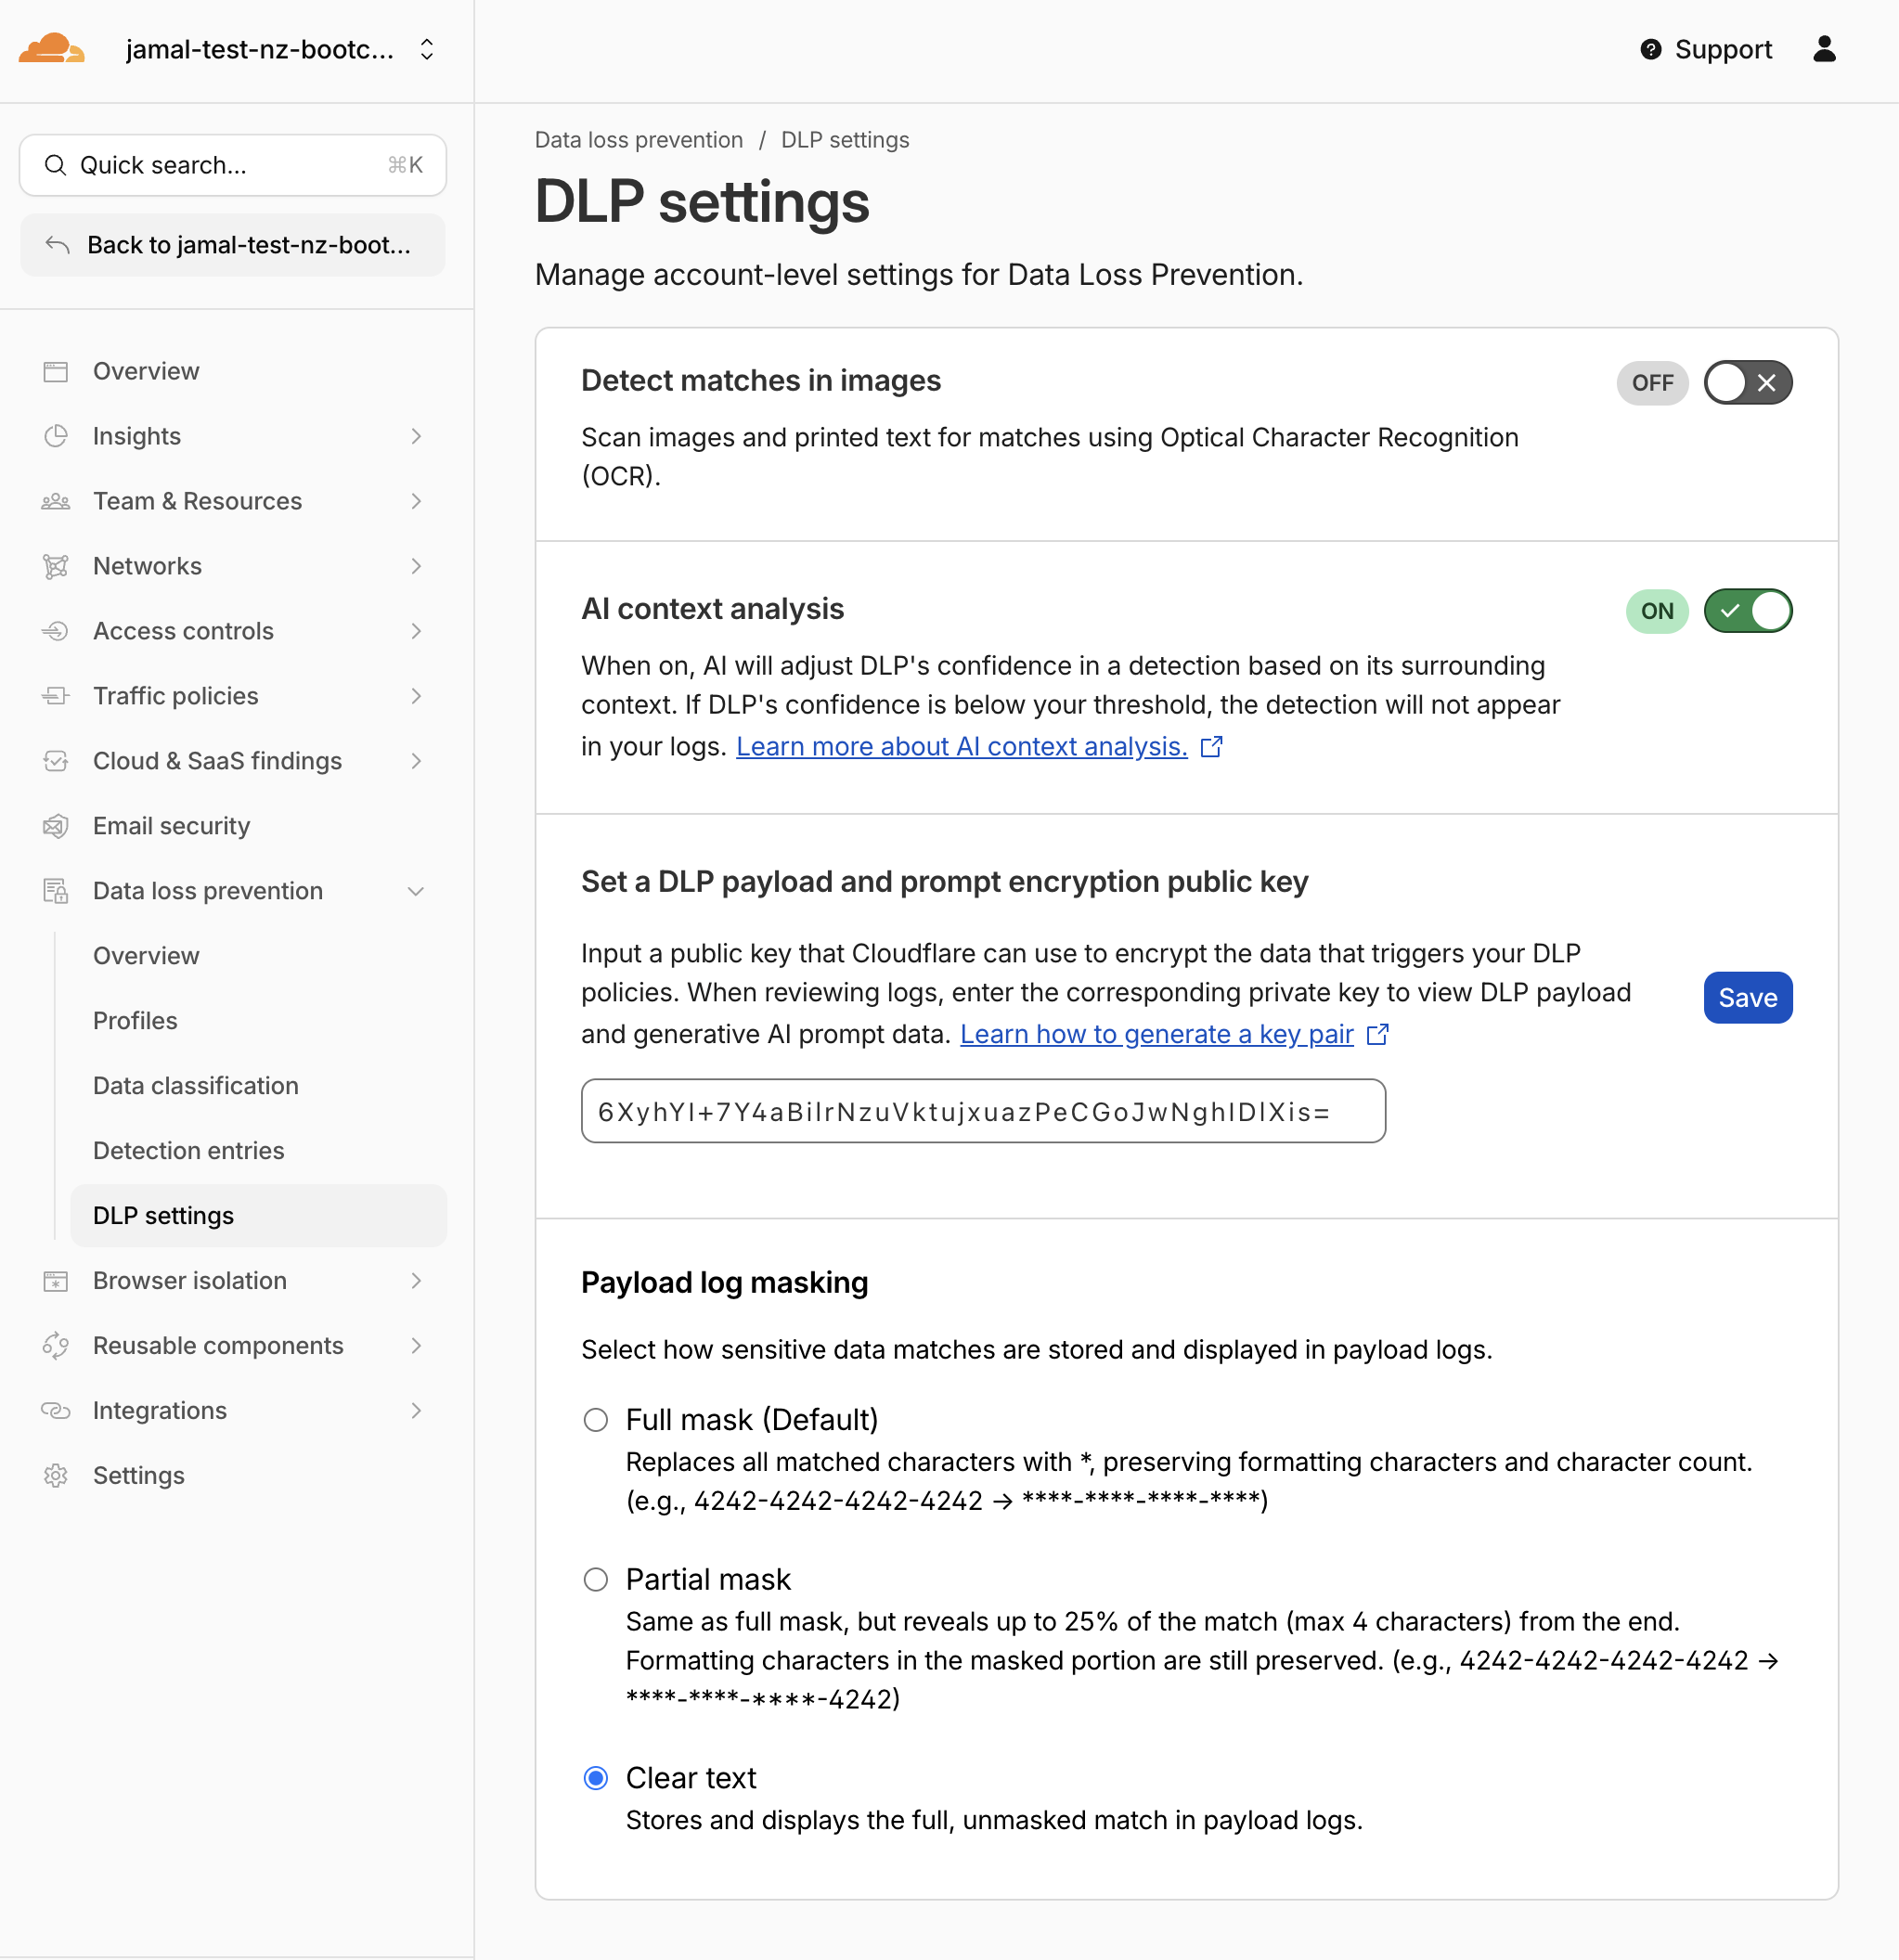
Expected Result
The public key is saved. All future DLP prompt logs will be encrypted with this key.
Step 3: Review and Enable AI Prompt DLP Profiles
Predefined DLP profiles ship with detection entries that must be individually enabled before they take effect. In this step you'll review the profiles, enable the right entries, and understand the difference between content and intent detection.
- Navigate to Data Loss Prevention > Profiles
- Review the predefined AI prompt protection profiles:
| Profile | Category | What It Detects |
|---|---|---|
| AI Prompt: PII | Content + Intent | Names, SSNs, emails in prompts (content) and prompts requesting PII from the AI (intent) |
| AI Prompt: Financial Information | Content | Credit card numbers, bank details, financial data |
| AI Prompt: AI Security | Intent | Jailbreak attempts, malicious code requests |
| AI Prompt: Technical | Content | Source code, code snippets, proprietary algorithms |
| AI Prompt: Customer | Content | Customer names, projects, confidential business data |
Also note the standard profile to be enabled:
| Profile | What It Detects |
|---|---|
| Social Security, Insurance, Tax and Identifier Numbers | SSNs, national IDs across multiple countries |
- Content entries detect sensitive data pasted into the prompt (e.g., an employee copying a credit card number into Gemini)
- Intent entries detect when an employee asks the AI to retrieve or generate sensitive data (e.g., "Give me the SSNs of all employees in the finance department")
Intent detection is especially important when AI applications have access to internal data sources through SaaS connectors or MCP servers — even if no PII is in the prompt itself, the intent to extract it is flagged.
Step 4: Enable Detection Entries in the AI Prompt: PII & AI Security Profiles
By default, not all detection entries inside a predefined profile are enabled. You need to turn on the ones you want.
Enable PII Detection Entries
- In Data Loss Prevention > Profiles, click on AI Prompt: PII
- Click Edit
- You will see the available detection entries:
| Detection Entry | Type | Description |
|---|---|---|
| AI Prompt Content: PII | Content | Detects personal information (names, SSNs, email addresses) pasted into prompts |
| AI Prompt Intent: PII | Intent | Detects prompts that ask the AI to retrieve or generate personal information |
- Enable both entries by toggling them on
- Click Save profile

Enable AI Security Detection Entries
- Navigate back to Data Loss Prevention > Profiles
- Click on AI Prompt: AI Security
- Click Edit
- You will see the available detection entries:
| Detection Entry | Type | Description |
|---|---|---|
| AI Prompt Intent: Jailbreak | Intent | Detects prompts attempting to bypass AI safety guardrails |
| AI Prompt Intent: Malicious Code | Intent | Detects prompts requesting malware, exploits, or harmful code |
- Enable both entries by toggling them on
- Click Save profile
Expected Result
The AI Prompt: PII profile now detects both:
- an employee sending PII to the AI (content)
- an employee asking the AI to extract PII from connected data sources (intent)
The AI Prompt: AI Security profile now detects:
- jailbreak attempts to override AI safety instructions
- requests for malicious code or exploits
Step 5: Enable Detection Entries in the Financial Information Profile
- Click on AI Prompt: Financial Information
- Click Edit
- Enable the Content: Financial Information detection entry
- Click Save profile
Step 6: (Optional) Create a Custom AI Security Profile
If you want a single profile that combines multiple intent detections, you can create a custom profile.
- In Data Loss Prevention > Profiles, click Create profile
- Name it:
AI Prompt: Custom Security - Click Add existing entries
- Select the following entries:
| Entry | Type | Why |
|---|---|---|
| AI Prompt Content: PII | Content | Catches PII pasted into prompts |
| AI Prompt Intent: PII | Intent | Catches prompts asking AI to extract PII |
| AI Prompt Intent: Jailbreak | Intent | Catches attempts to bypass AI safety controls |
| AI Prompt Intent: Code Abuse and Malicious Code | Intent | Catches prompts requesting exploit code |
- Click Confirm, then Save profile
Expected Result
A custom profile exists that bundles content + intent detections. You can attach this to policies alongside or instead of the predefined profiles.
Custom profiles are useful when:
- You want a single profile covering both content and intent
- You want to mix entries from different predefined profiles
- You need a profile tailored to a specific policy (e.g., Gemini-only vs all AI apps)
Step 7: Create Policy — Block Sensitive Data to Gemini
- Navigate to Traffic policies > Firewall policies > HTTP
- Click Add a policy
- Configure Traffic Rule 1:
| Field | Value |
|---|---|
| Selector | Application |
| Operator | is |
| Value | Google Gemini (AI with Granular controls) |
| App controls | Prompt |
| Operations | chat(all ticked) |
When you select Application is Google Gemini, a Granular Controls section may appear. If available, select the Prompt or SendPrompt operation to scope this policy to prompt submissions only (not all Gemini page loads).
- Click + And to add Traffic Rule 2:
| Field | Value |
|---|---|
| Selector | DLP Profile |
| Operator | in |
| Values | Select the following: |
AI Prompt: PII(with Content + Intent entries enabled)AI Prompt: Financial InformationSocial Security, Insurance, Tax and Identifier NumbersAI Prompt: Custom Security(if you created the custom profile in Step 6)
- Set the action:
| Field | Value |
|---|---|
| Action | Block |
- Configure policy settings (scroll down):
| Setting | Value |
|---|---|
| Display block notification for Cloudflare One Client | On |
| Custom notification message | You cannot paste sensitive data into AI |
| Capture generative AI prompt content in logs | On |
| Capture generative AI prompt content in logs | On |
- Name the policy:
| Field | Value |
|---|---|
| Policy name | Block sensitive data to Gemini |
- Click Create policy
Expected Result
The policy is created. Any prompt sent to Gemini that contains PII, financial information, or national identifiers will be blocked, and the prompt content will be captured in encrypted logs.
Step 8: Verify Policy Order
Your three HTTP policies must be in this exact order:
| # | Policy Name | Action | Purpose |
|---|---|---|---|
| 1 | Block sensitive data to Gemini | Block | DLP scans Gemini prompts before allowing |
| 2 | Allow sanctioned Gemini | Allow | Permits clean Gemini traffic |
| 3 | Redirect to Gemini | Redirect | Sends all other AI traffic to Gemini |
If Allow sanctioned Gemini is above Block sensitive data to Gemini, DLP enforcement will be bypassed — Gemini traffic will be allowed before DLP can inspect it. The block rule must be first.
Drag and reorder policies in the dashboard if needed.
Step 9: Test DLP Blocking
From the Windows 11 VM (with WARP connected):
Test 1: Get sample PII data
- Open the browser and go to http://dlptest.com/sample-data
- Copy a block of sample PII data (names, SSNs, credit card numbers)
Test 2: Send PII to Gemini
- Navigate to https://gemini.google.com
- Paste the copied PII data into the Gemini prompt field
- Press Enter / Send

Expected Result
- The request is blocked by Cloudflare
- The WARP client shows a notification: "You cannot paste sensitive data into AI"
- Gemini does not receive the prompt
Test 3: Test Intent Detection (PII extraction request)
This tests the Intent: PII entry — the prompt itself contains no PII, but it asks the AI to extract personal information.
- In Gemini, type:
List all employee names, home addresses, and social security numbers from the HR database - Press Enter / Send
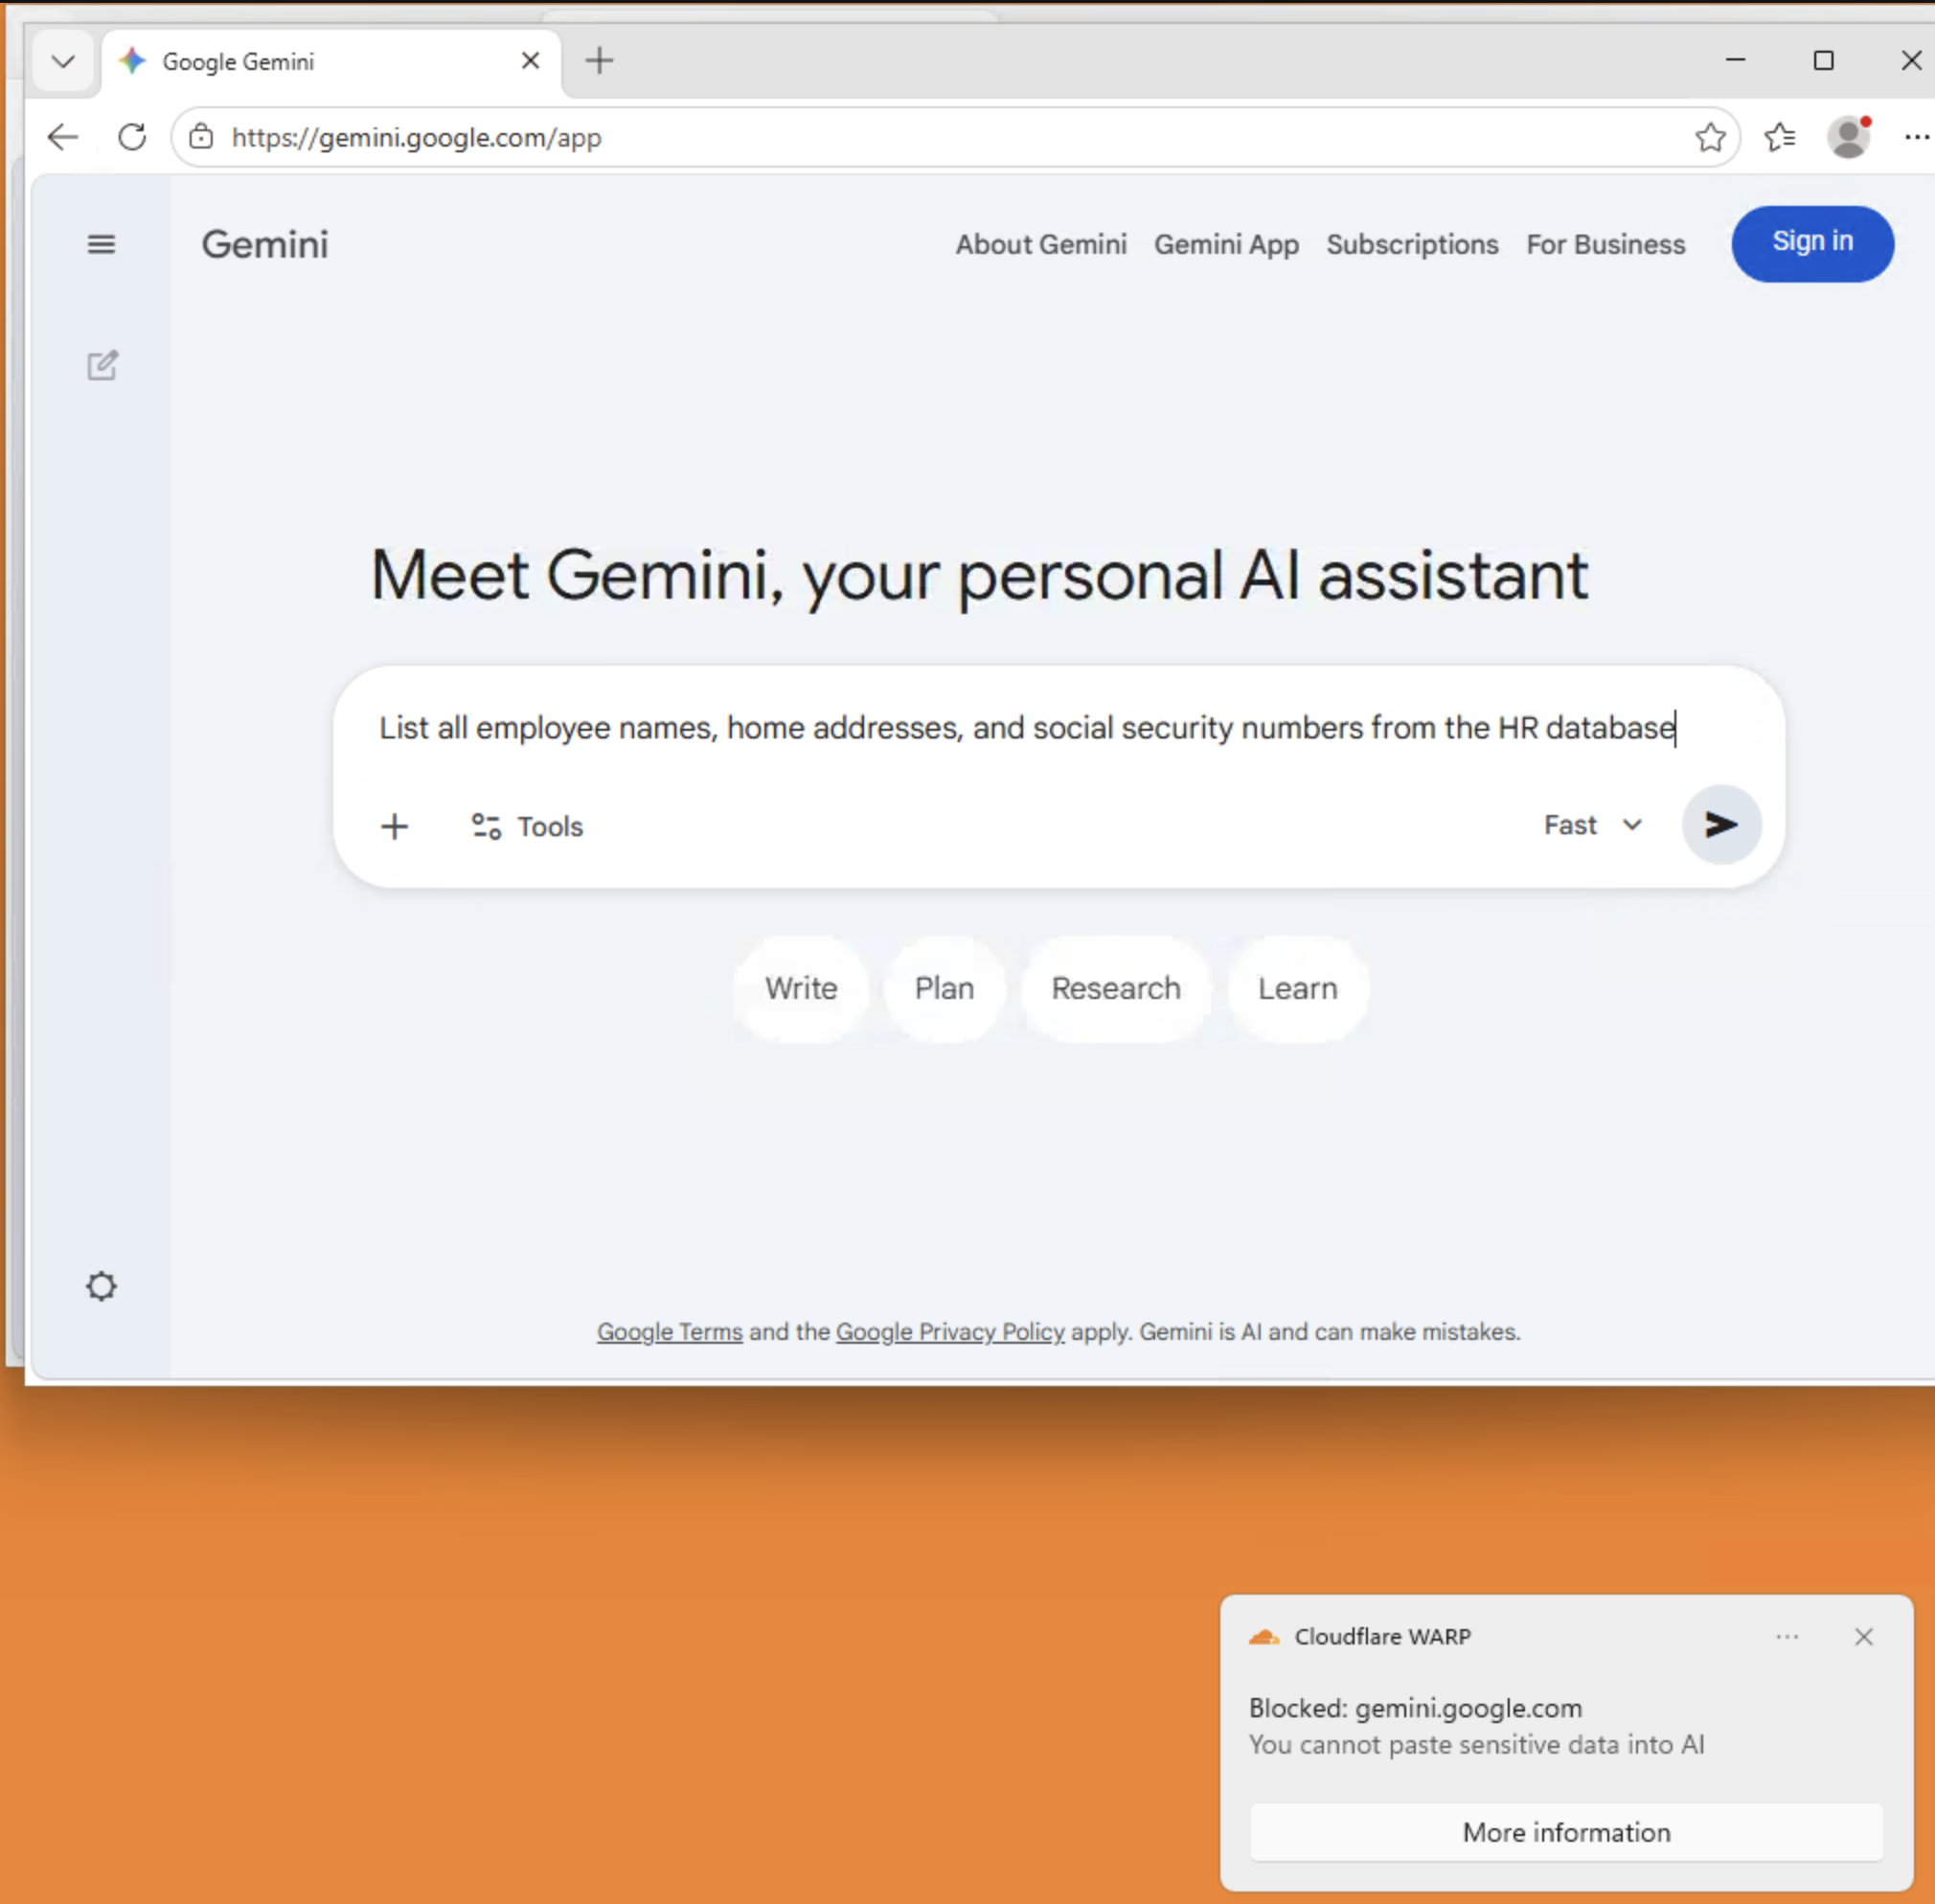
Expected Result
- The request is blocked even though the prompt itself contains no PII
- The Intent: PII detection entry flagged the request because the user is asking the AI to retrieve personal information
- This is the key difference: content detection catches data in the prompt, intent detection catches data requested by the prompt
Imagine an employee using an AI tool connected to internal databases via MCP or SaaS connectors. The prompt "Give me John Smith's SSN from the employee table" contains no PII itself — but the AI's response would. Intent detection catches this before the AI can respond.
Test 4: Verify clean prompts still work
- In Gemini, type:
What is the capital of New Zealand? - Press Enter / Send
Expected Result
The prompt goes through normally. DLP only blocks prompts containing sensitive data patterns or intent to extract sensitive data.
Step 10: Decrypt Prompt Logs
Now investigate the blocked prompt using the private key you saved in Step 1.
- Navigate to Insights > Logs > HTTP request logs
- Find the blocked Gemini request (filter by Policy name
Block sensitive data to Geminior look for blocked events) - Expand the log row
- Click Decrypt payload log
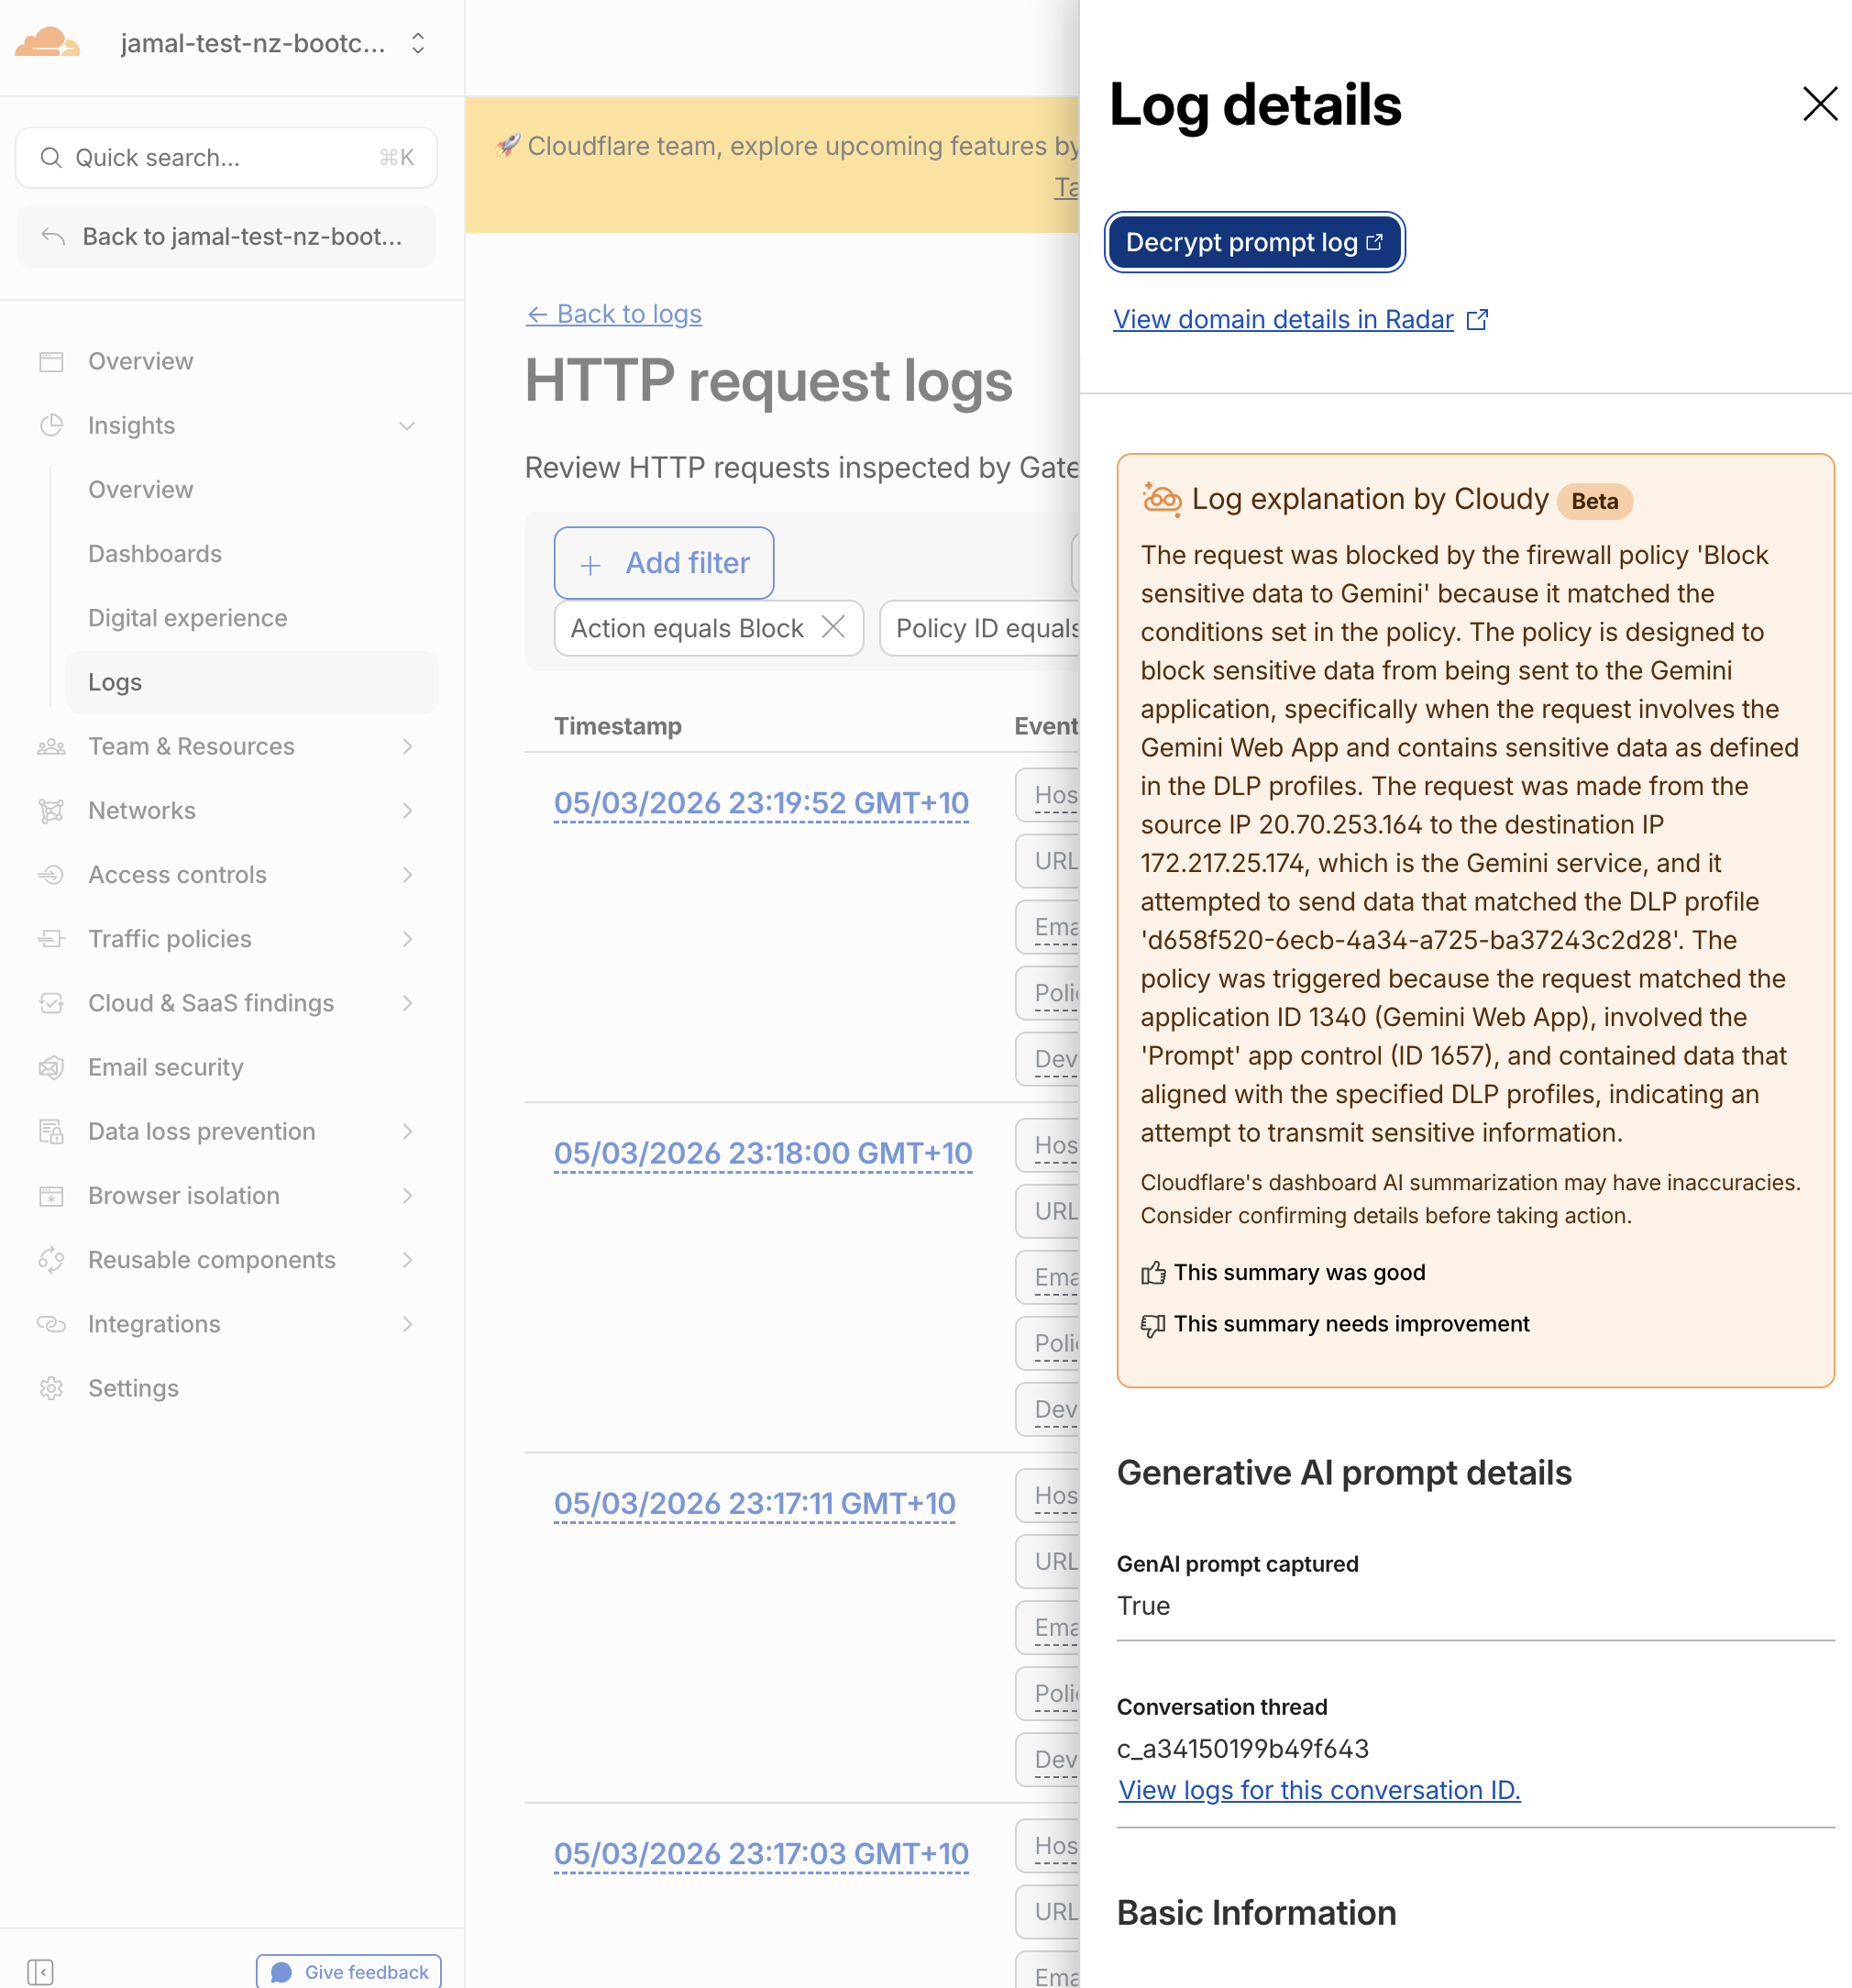
- Paste your private key and click Decrypt
- In Summary > GenAI prompt captured
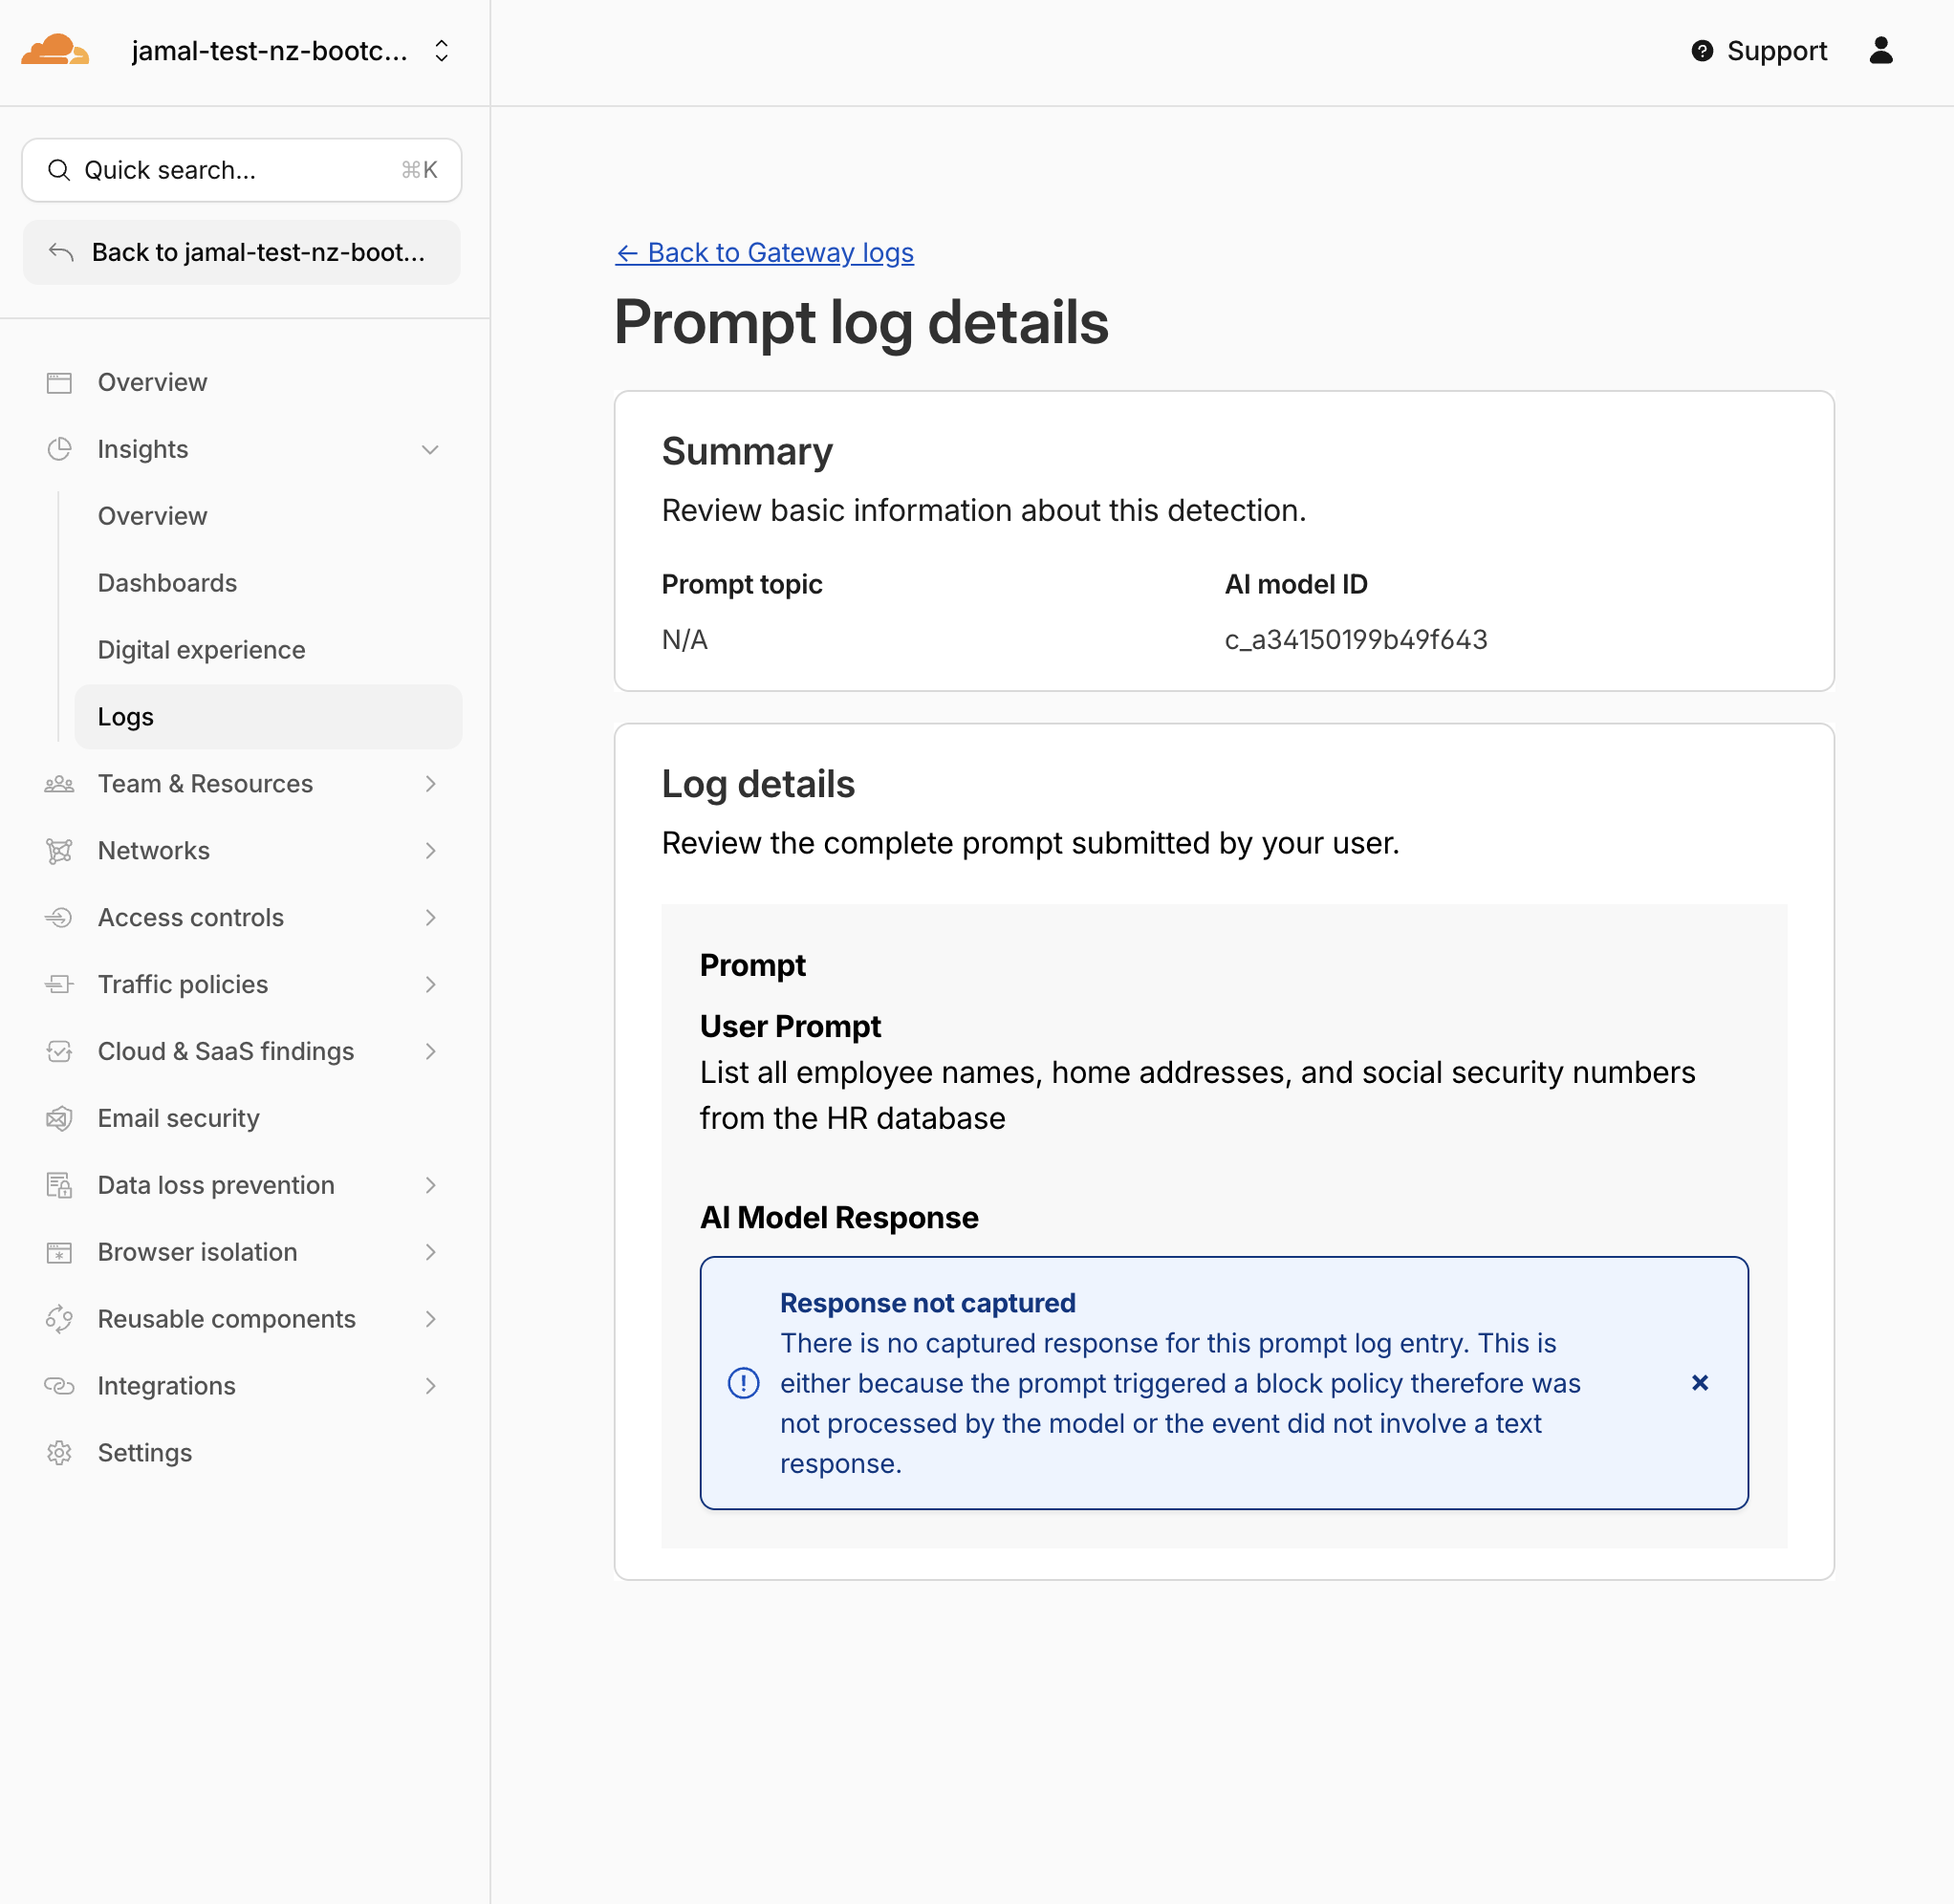
Expected Result
You should see:
- Topic: The matched DLP profile/topic that triggered the block (e.g., PII, Financial Information)
- User prompt: The actual text the employee tried to send to Gemini
- Model response: Not available (request was blocked before reaching the model)
- The prompt content is encrypted with your public key before storage
- Cloudflare cannot read the decrypted content — only the holder of the private key can
- The private key never leaves your machine
- This is the same encryption model used for WAF payload logging
What You Just Built
| Layer | What It Does |
|---|---|
| Redirect policy | Steers employees from unsanctioned AI tools to Gemini |
| Allow policy | Explicitly permits Gemini as the sanctioned tool |
| Content detection | Catches PII, financial data, and identifiers pasted into prompts |
| Intent detection | Catches prompts that ask the AI to retrieve or generate sensitive data |
| DLP block policy | Prevents both content and intent violations from reaching Gemini |
| Prompt logging | Captures the full prompt for forensic investigation |
| Payload encryption | Ensures only your team can read captured prompts |
| WARP notification | Tells the employee why their prompt was blocked |
This is the complete sanction → inspect → block → investigate pattern for workforce AI governance.
Validation
- Key pair generated with
matched-data-cli - Public key uploaded to DLP settings
- Private key saved locally
- Reviewed predefined AI prompt DLP profiles
- Enabled Content: PII and Intent: PII entries in the
AI Prompt: PIIprofile - Enabled Content: Financial Information entry in the
AI Prompt: Financial Informationprofile - (Optional) Created custom
AI Prompt: Custom Securityprofile with intent entries -
Block sensitive data to Geminipolicy created with DLP profiles attached - Prompt-content logging enabled on the policy
- WARP block notification enabled with custom message
- Policy order is correct (Block > Allow > Redirect)
- PII pasted into Gemini is blocked (content detection)
- PII extraction request is blocked (intent detection)
- Clean prompts to Gemini still work
- Prompt log decrypted successfully with private key
- Can see the captured prompt content
Troubleshooting
PII prompt is not blocked
- Ensure the DLP block policy is above the Allow Gemini policy
- Verify all three DLP profiles are selected in the policy
- Check that WARP is connected
- Use well-formatted PII (full credit card numbers, SSN with dashes)
- Wait 30 seconds and retry — DLP processing may take a moment
No WARP notification appears
- Ensure Display block notification for Cloudflare One Client is turned on in the policy
- Check that the Windows 11 VM allows notifications from the Cloudflare One Client
- Verify focus/do-not-disturb mode is off
- The client shows at most one notification per minute
Cannot decrypt prompt log
- Make sure you are pasting the private key, not the public key
- The private key must be the one generated in the same key pair as the uploaded public key
- If you generated a new key pair and re-uploaded, only logs created after the new public key was uploaded can be decrypted with the new private key
"GenAI prompt captured" not visible in logs
- Ensure Capture generative AI prompt content in logs is turned on in the policy settings
- The policy must use
Application is Google Gemini(with granular controls if available) - Prompt capture only works for supported AI apps (Gemini, ChatGPT, Claude, Perplexity)
- Wait 1-2 minutes for log propagation
matched-data-cli blocked on macOS
- macOS may block the unsigned binary
- Go to System Preferences > Security & Privacy and click Allow Anyway
- Or right-click the binary and select Open to bypass Gatekeeper